
Matcha Waffles
I have a lot of matcha recipes planned for this summer! Mostly because summer is kind of go, go, go and matcha powder makes everything so easy!
I don’t generally eat a lot of starchy carbs except for rice but one of my all time favorite things is waffles!!! I remember back in high school, I requested that my birthday dinner be at eggspectations because they serve waffles all day and night - chocolate chip, of course.
Please note, This post and the photos within it contain affiliate links. If you purchase something through the link, I may receive a commission at no extra charge to you.
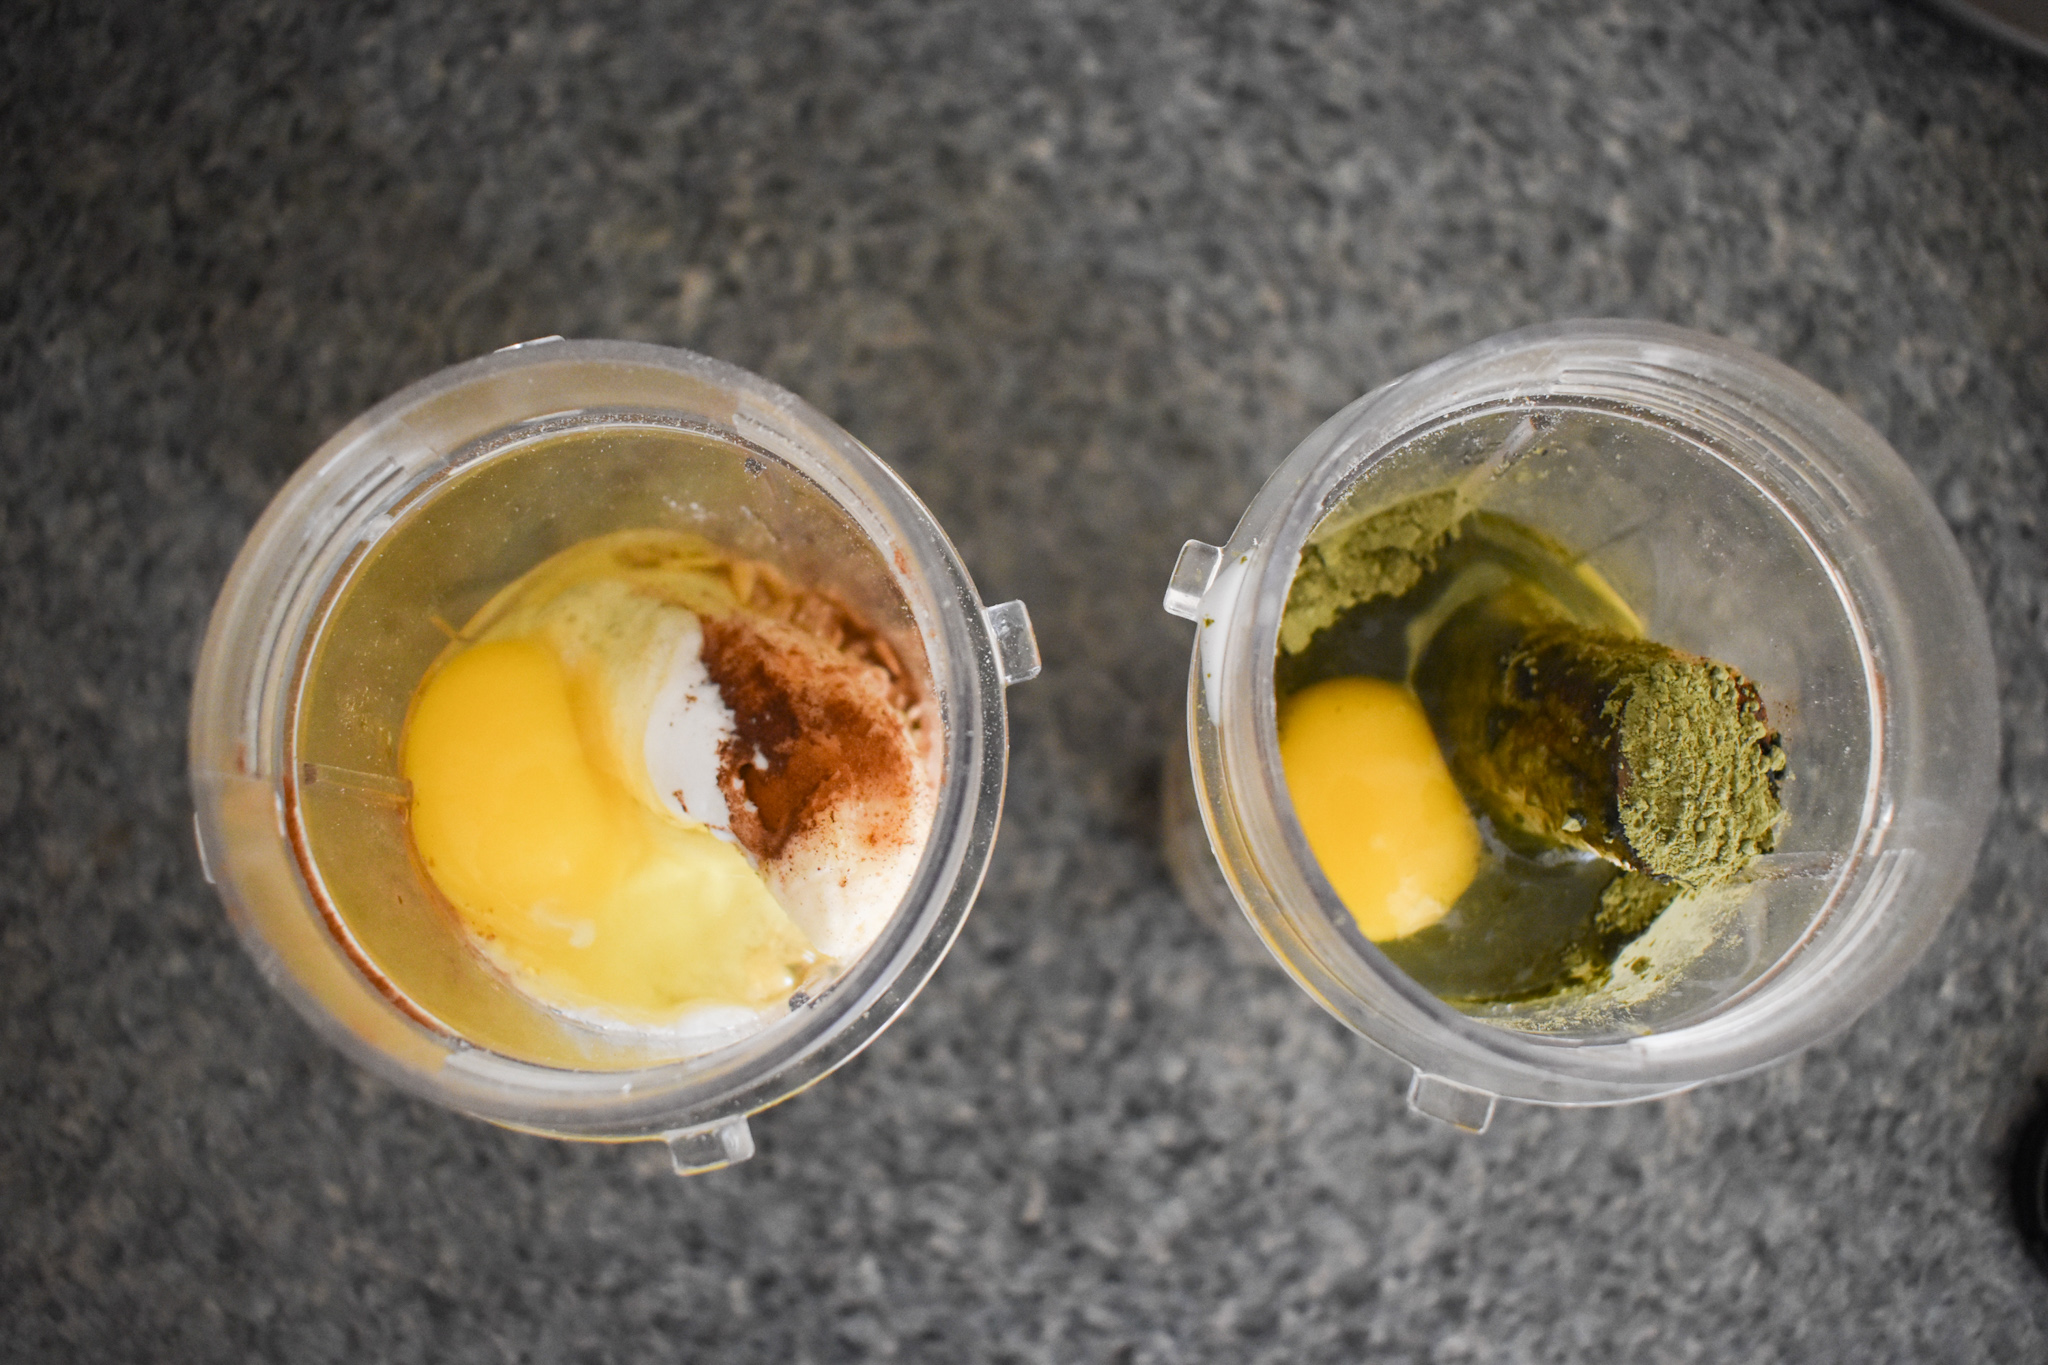
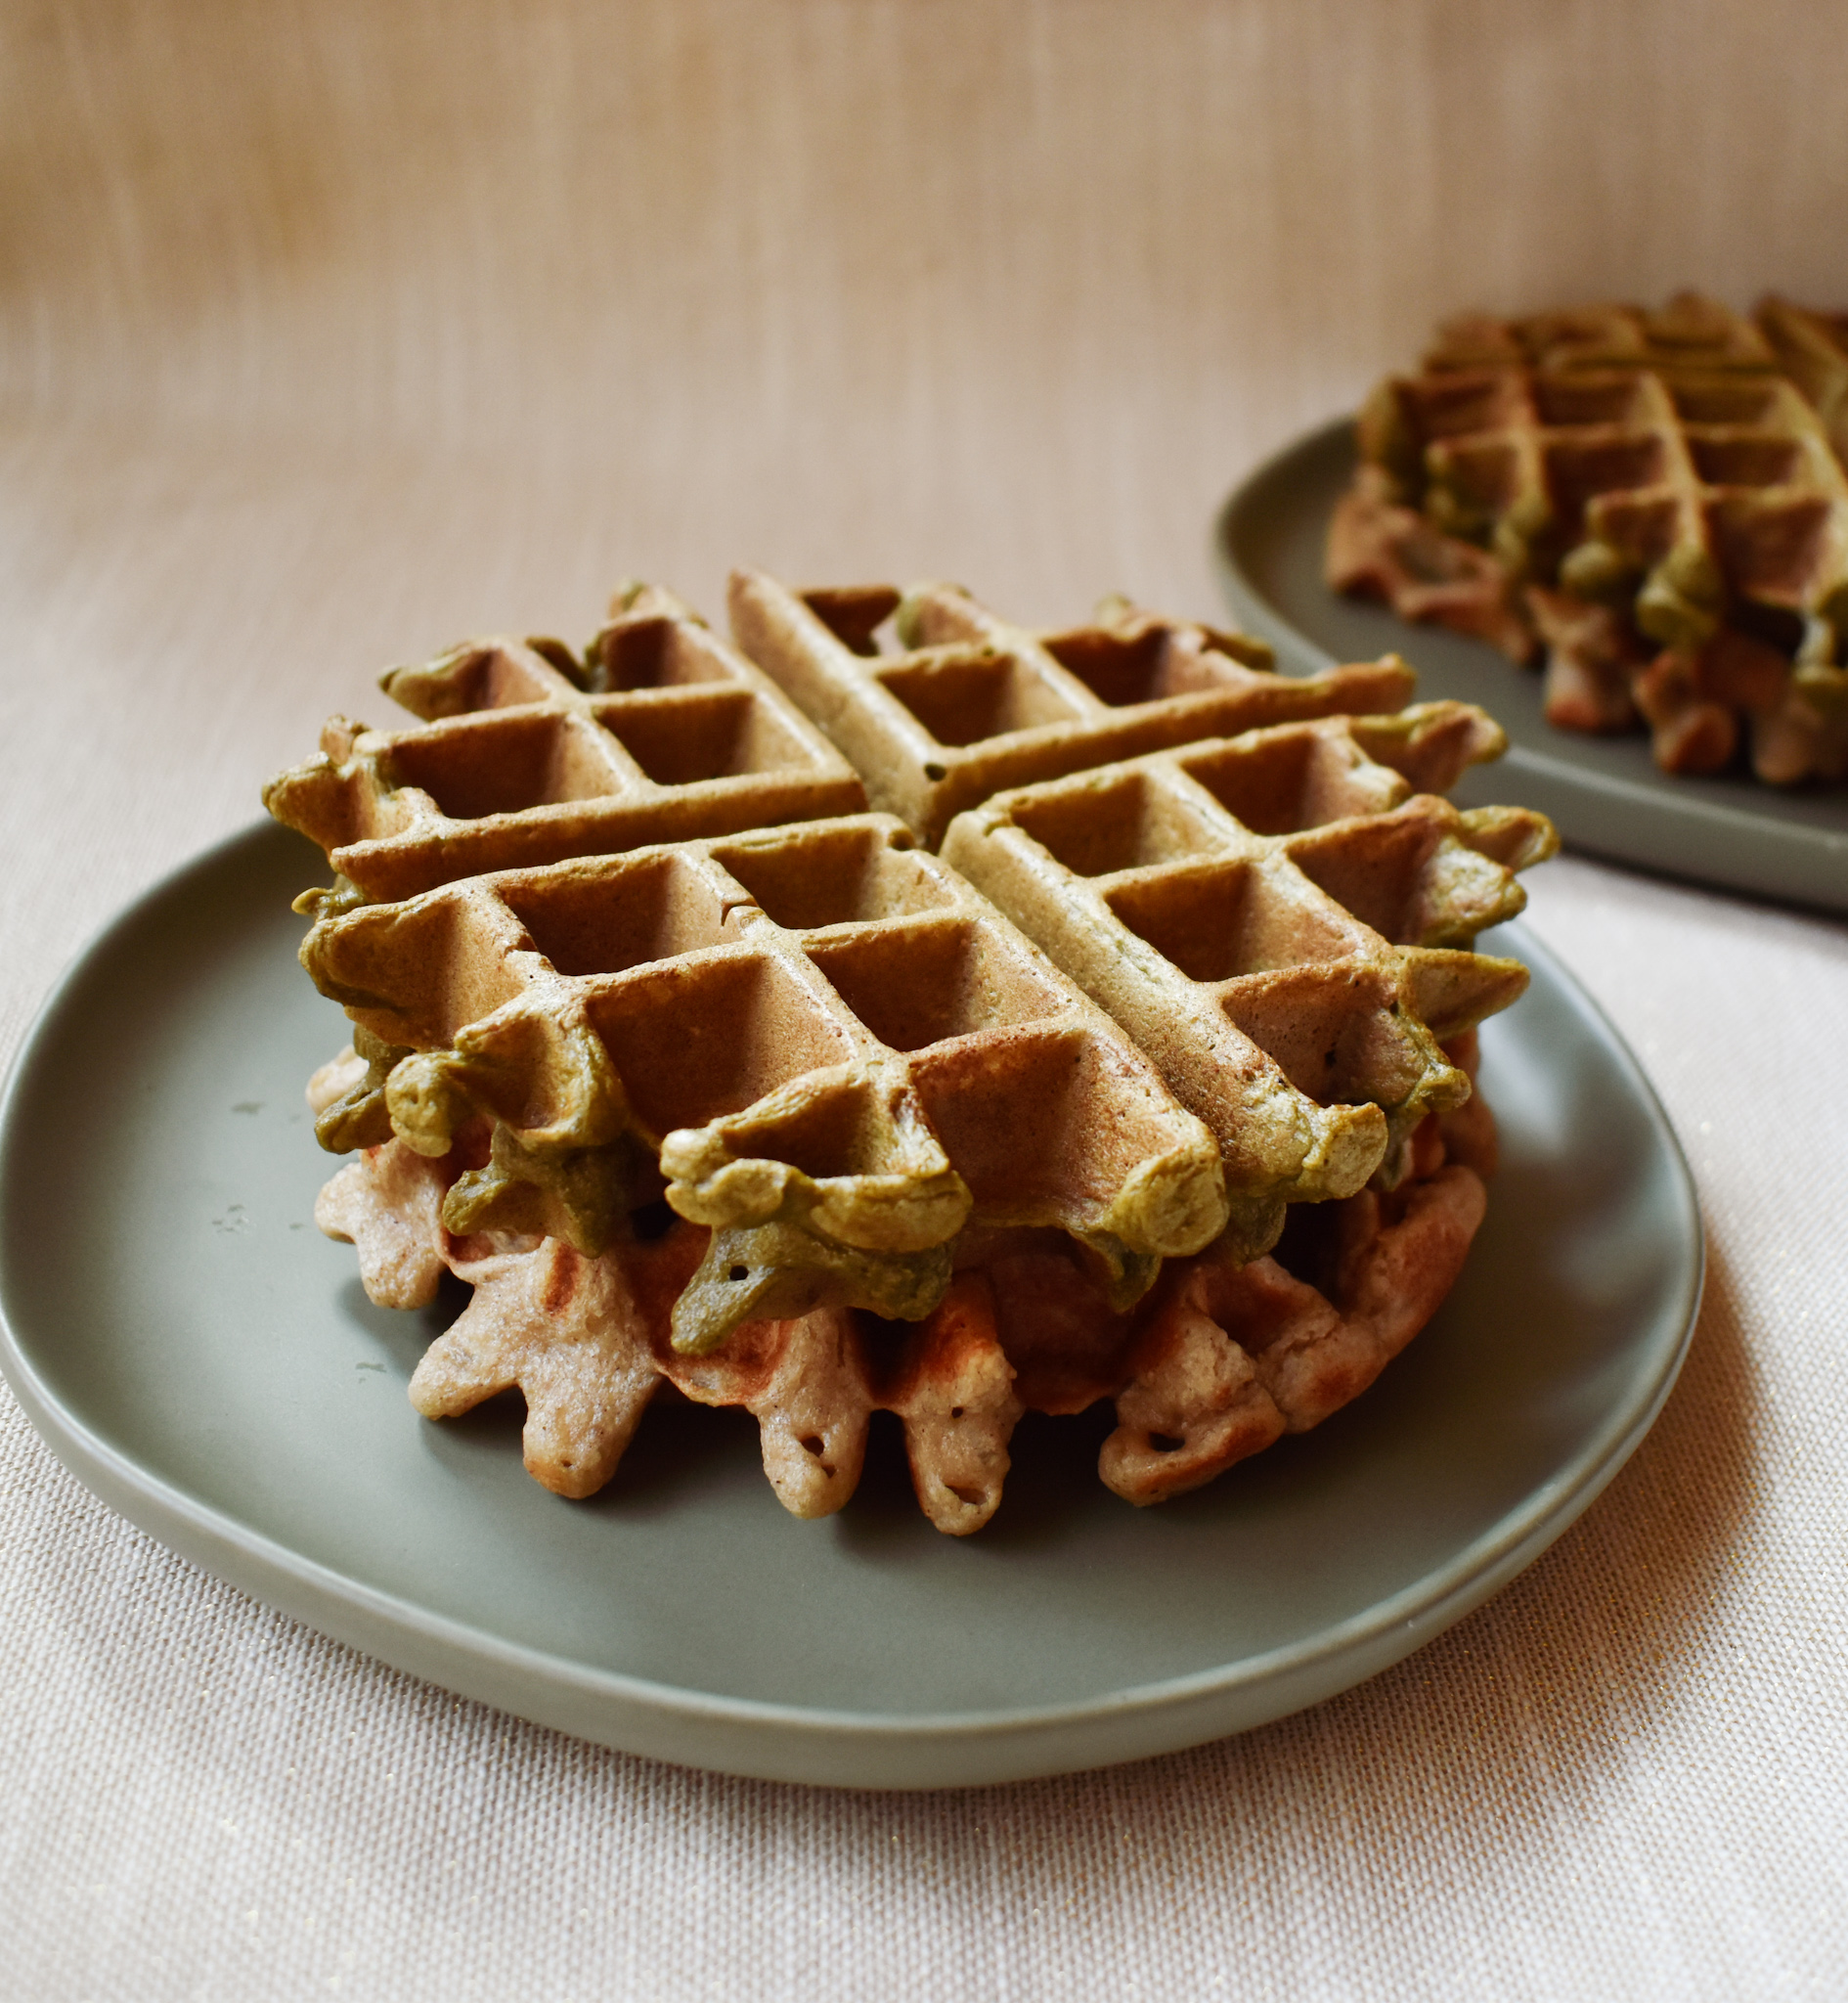
I was browsing waffle recipes and saw this one that was simply blended and used oats. I based my recipe off of this one! I don’t have a large blender but a small ninja smoothie blender. What I did was split all the ingredients into two batches like shown above and placed my matcha powder in one of them so I get two waffles of each! Feel free to use matcha for all your waffles!
My batter felt a little thick even for waffles so I added a little bit more cashew milk (the milk I used) for each batch. I have one of those waffle irons that flips and has a timer. I put a range of time on my recipe because people like their waffles differently. I cooked mine for about 4 minutes and that made a softer waffle with a touch of crisp. If you like crispy, I would go for 5-6 minutes. Here is the waffle maker I have, we got it a few years ago at Christmas time :) p.s. Christmas is almost here. Yes, I’m linking my fav countdown for you!!!

The top waffle is the matcha one and at first you may not see the green due to the golden crust but just bust these babies open and you will reveal that beautiful green! I really like the way the matcha and oats compliment each other in this recipe. I chose not to use any additional sweetener, but note that because a banana is used, these aren’t totally savory. There is a hint of sweet.

If you don’t know which matcha to use, I suggest Midori by Matchaeologist. It is a great quality matcha for culinary purposes!

Top these waffles with whatever treats you like! I usually love to either have just butter or some butter and fruit on my waffles!

Do you have a favorite waffle topping?!

Gyokuro Rice with roasted herbs and tomatoes
My brother brought me some gyokuro from his trip to Japan. Gyokuro is one of my favorite green teas and I have had good luck cooking with it in the past! You can find a previous shrimp recipe here.

This time I decided to take my love of rice on another test ride and cook it in gyokuro! I didn’t want to just use gyokuro so I decided to use a few other flavors with it as well. I wanted something savory and herbed.

Starting small, I used one cup of rice and only a few tomatoes but after trying this recipe I think I would like to have even more of the roasted ingredients in the rice and would definitely add more or even double the amount! I have timing for the roasted vegetables in the recipe but really you just want to make sure that they start to break down and give it a few mixes so that they soak up the oil and herbs.
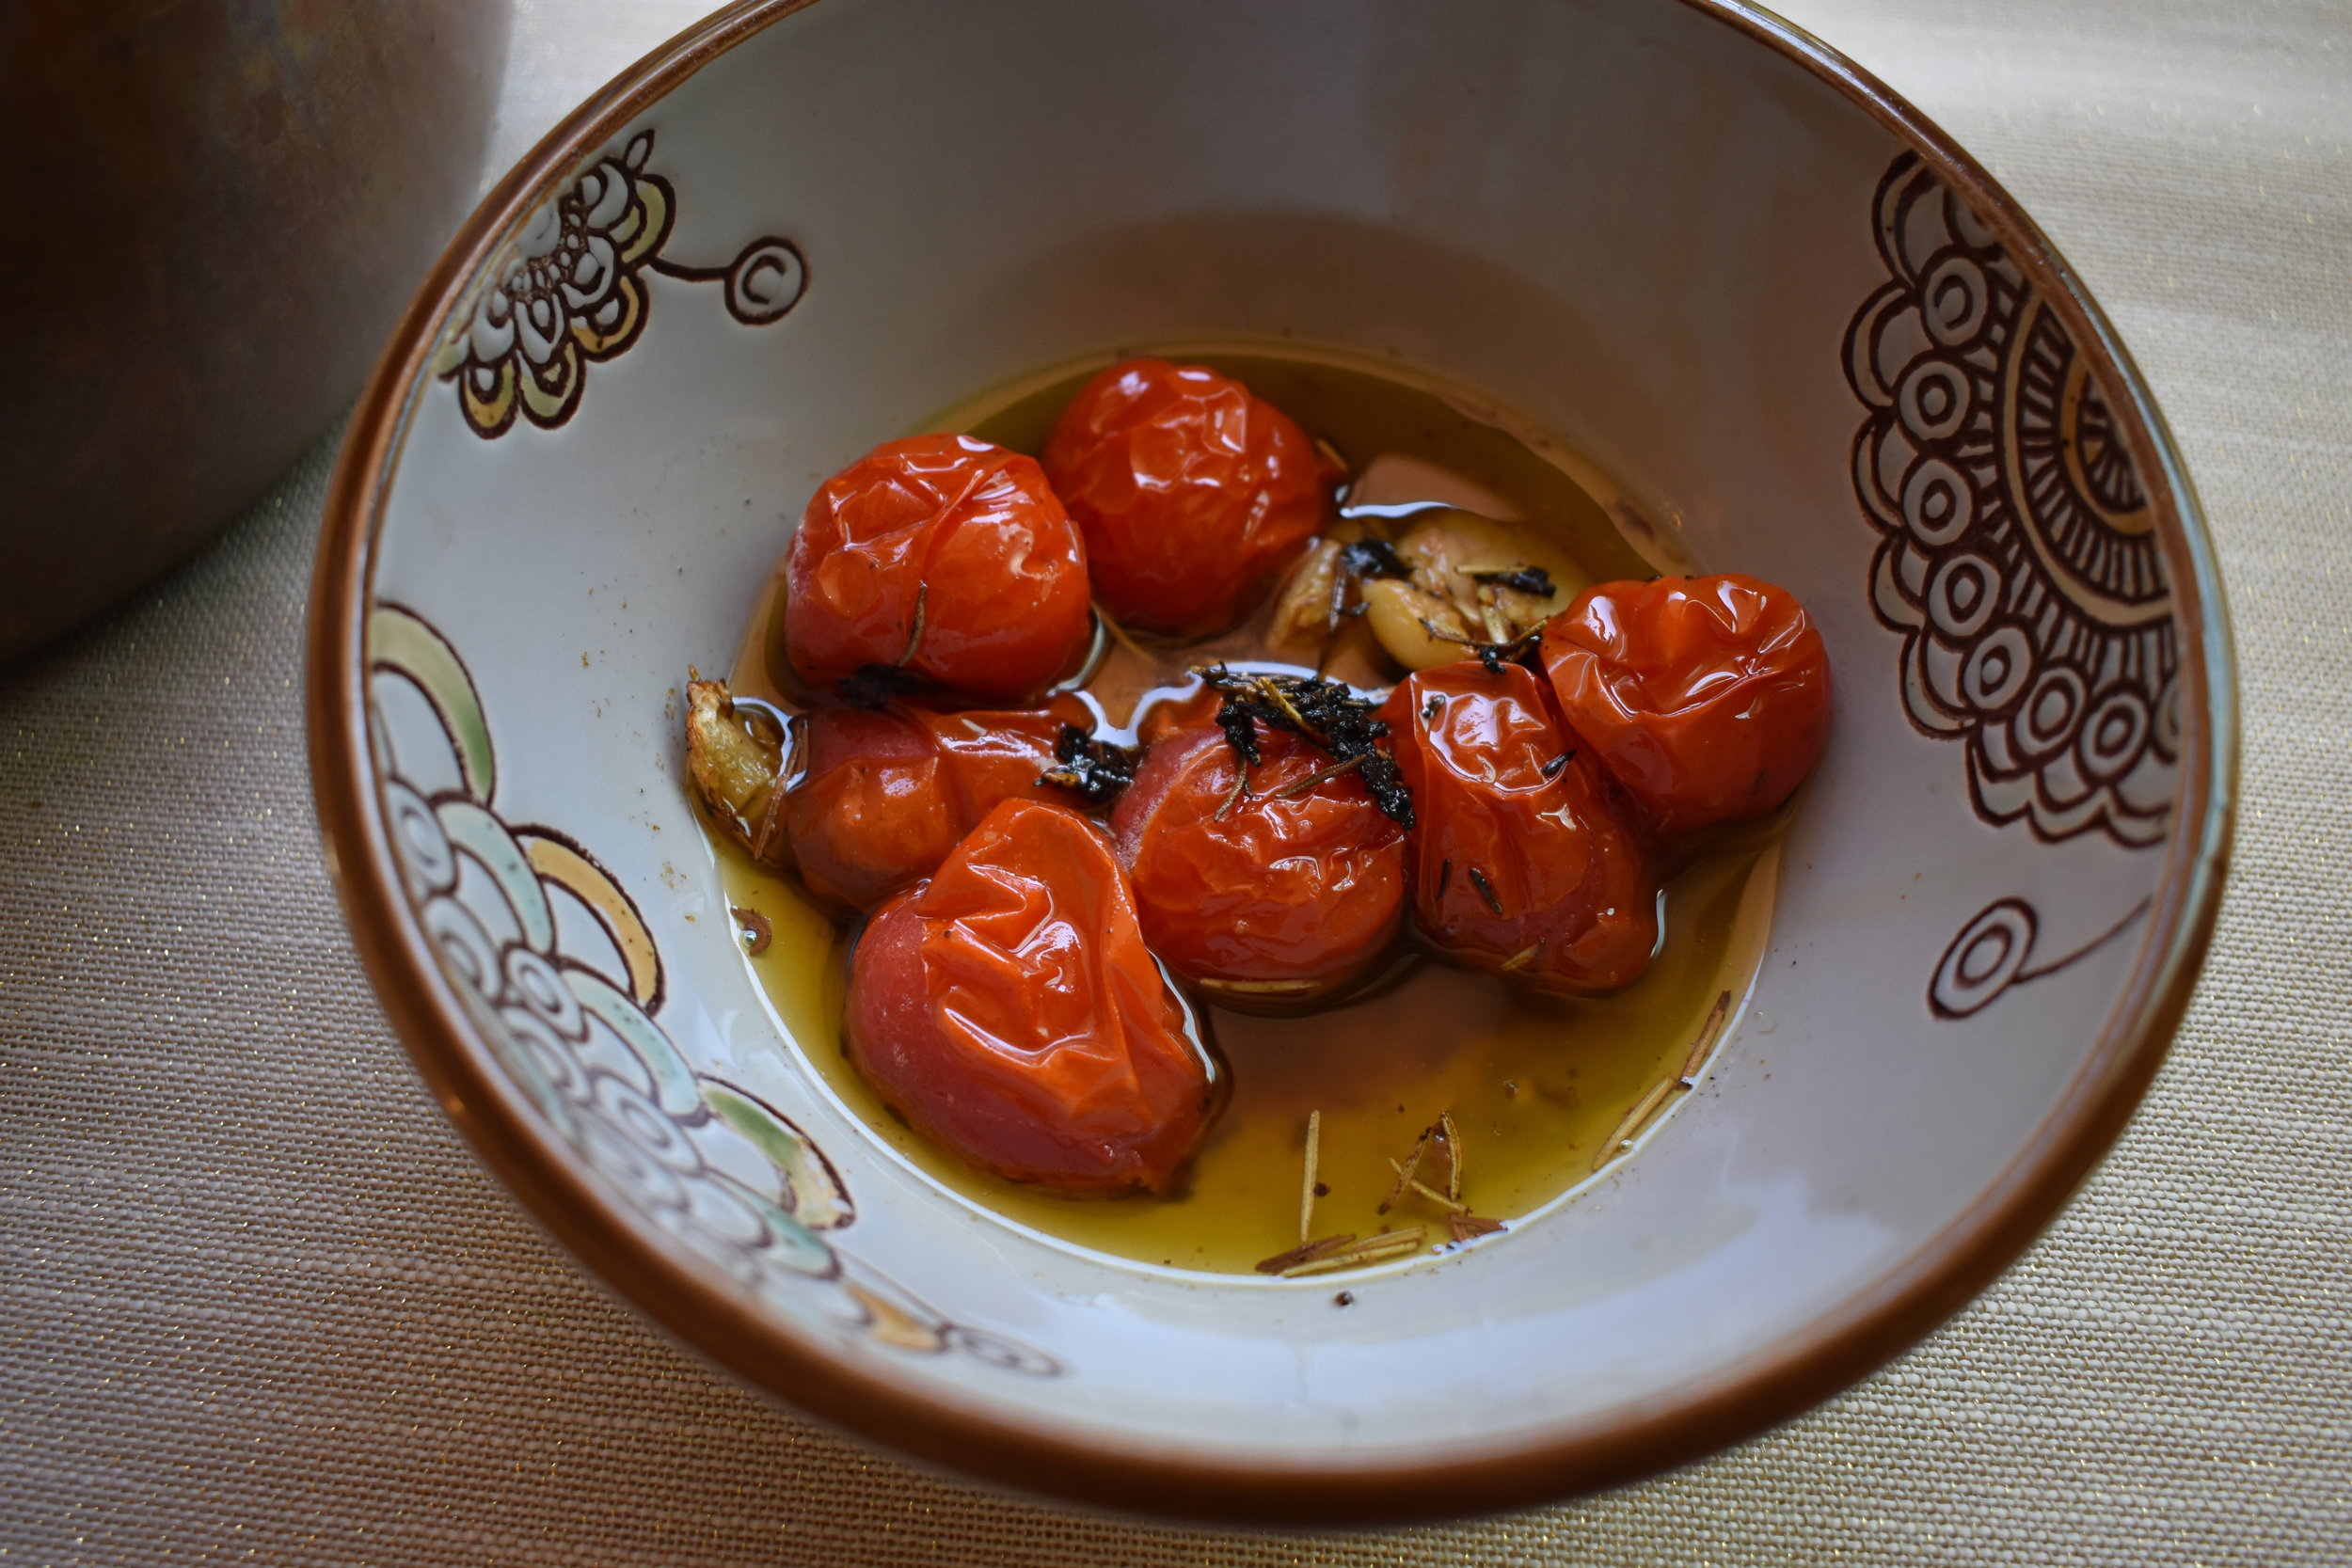
After you take the tomatoes and herbs out, place them in a bowl so that they can soak in the olive oil and herbs.

When making rice, olive oil at the start is important to make it tender and flavorful. Instead of adding olive oil plain, the tomatoes + herbs + olive oil are mixed into the rice + gyokuro mixture before cooking. In addition to mixing, I also smashed up some the tomatoes further before putting this on the stove.

When adding in the roasted ingredients, I would also suggest a taste test to manage the salt and pepper level. I didn’t add anything additional at this point because I added it to the roasting pan but I wish I had!

The result is a richer and more flavorful rice. I’ve combined a few favorites of mine here. First of all, rice. But the reason I added the roasted ingredients is because it is similar to many Persian rice dishes where the meal is in the rice. You have plenty of ingredients blended up in the rice and in this case it was herbs and tomatoes!


Hojicha Truffles
Have you ever tried hojicha? It is a delightful roasted green tea and while I love to drink it, I’ve always thought the flavor would make a great addition to sweets!
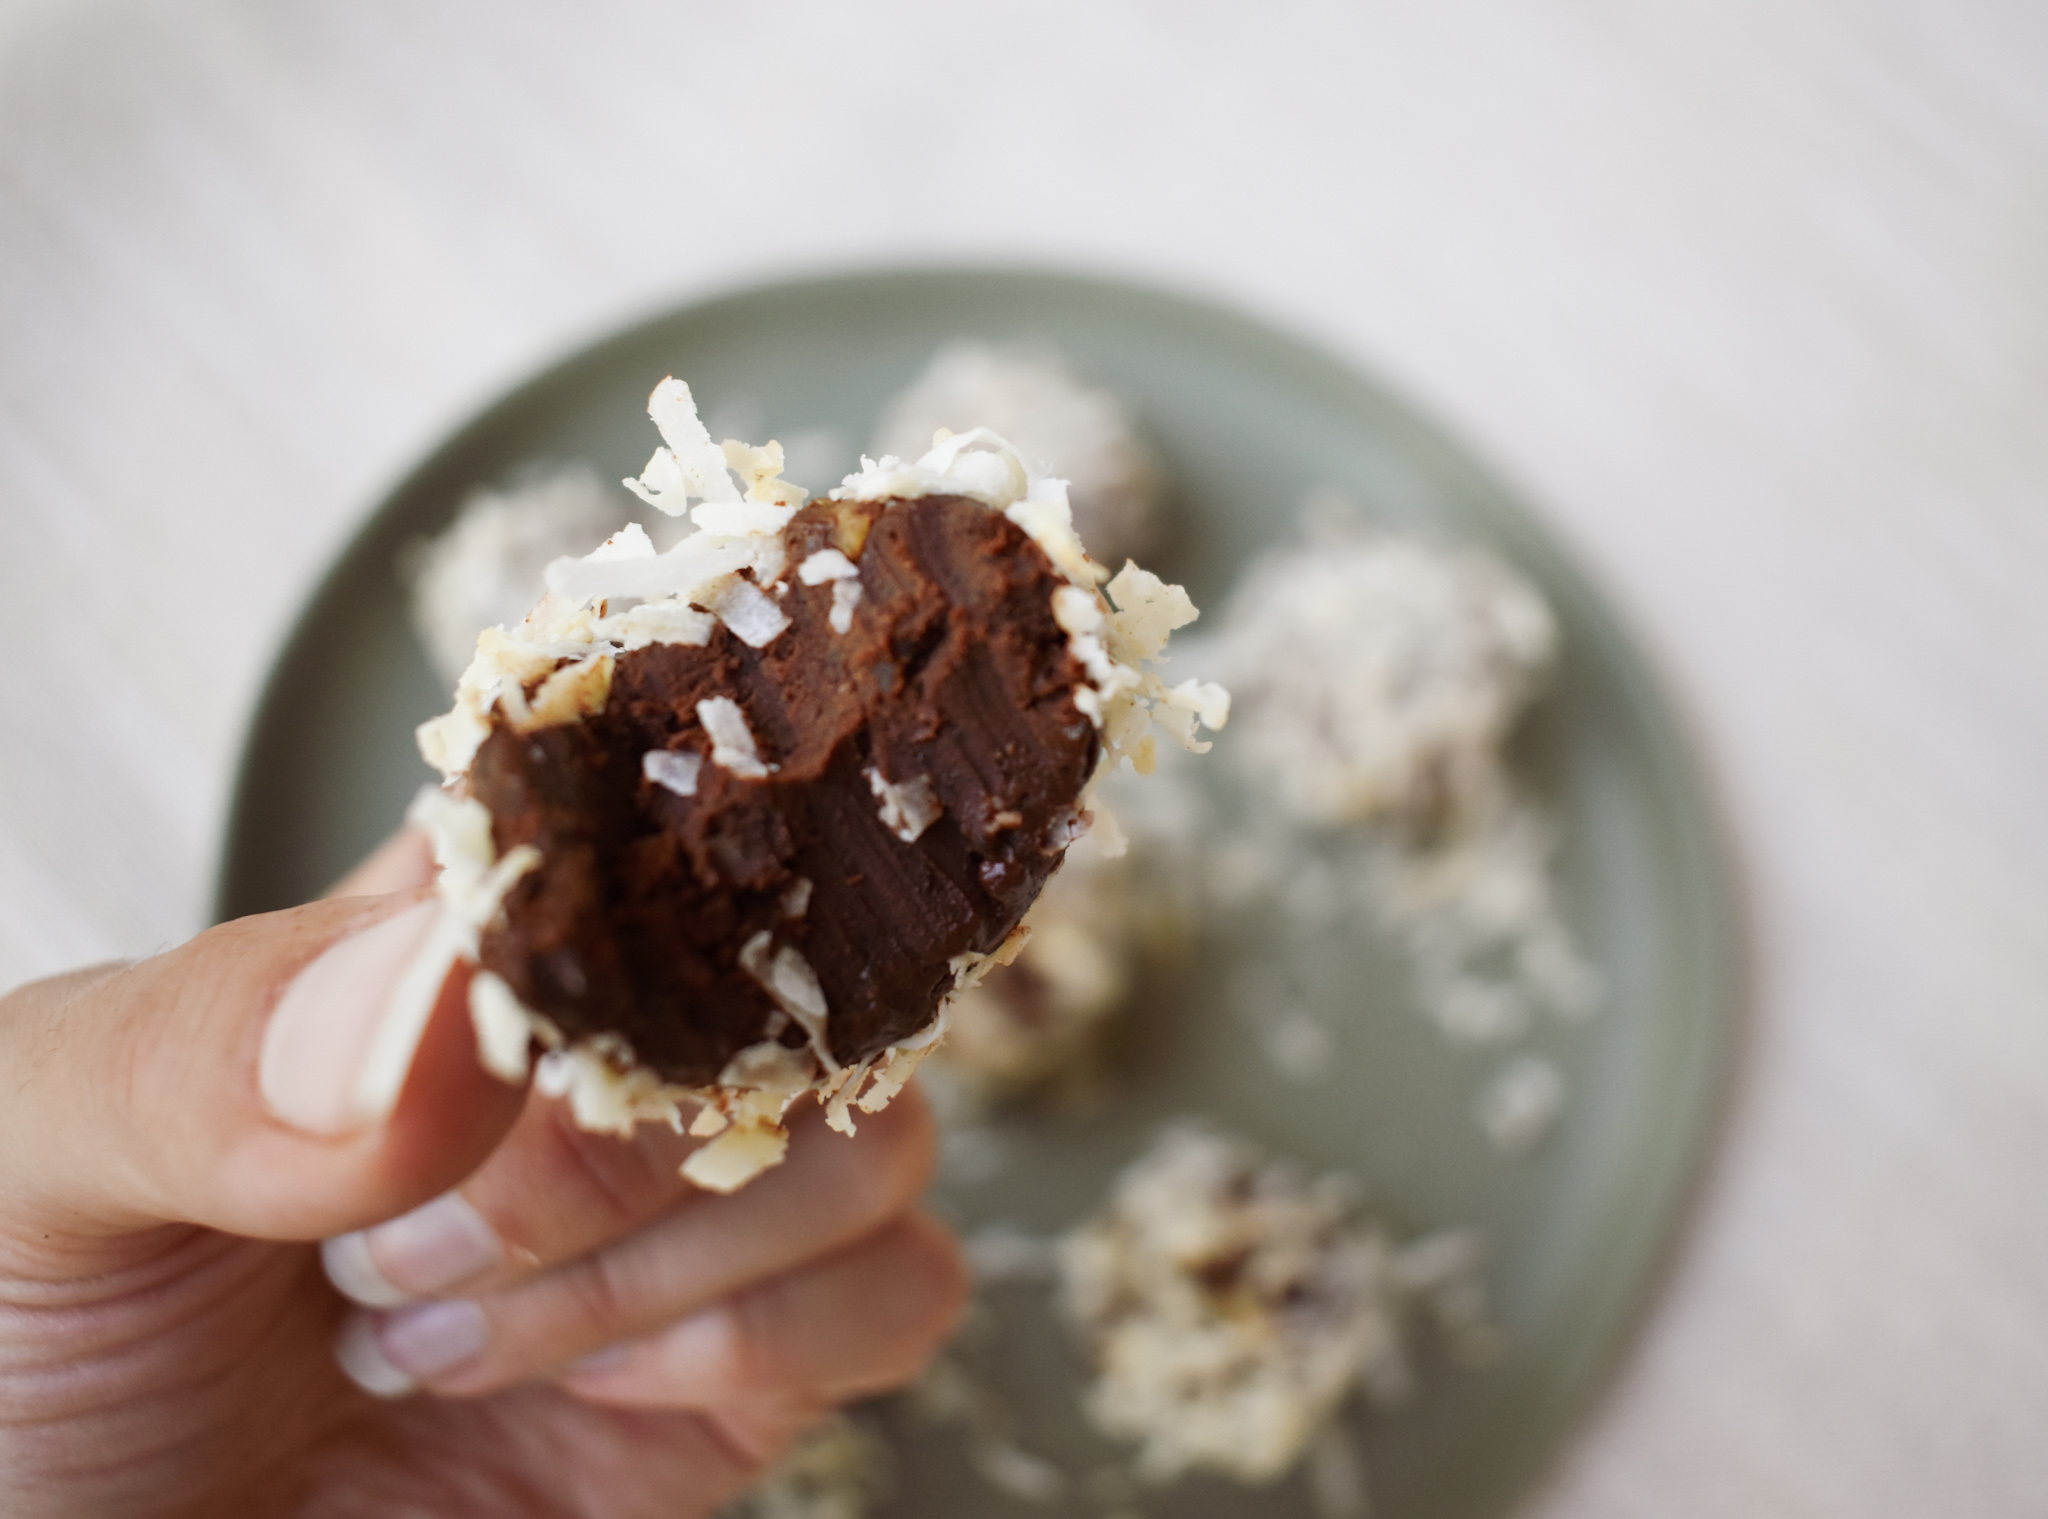
Hojicha has such a rich flavor I thought that truffles would make a great combo. Instead of infusing the tea into the truffles I decided to make powder of it.
I used the hojicha gold powder from Hojicha Co. but they also sell a powder if you’d like to skip the crushing!

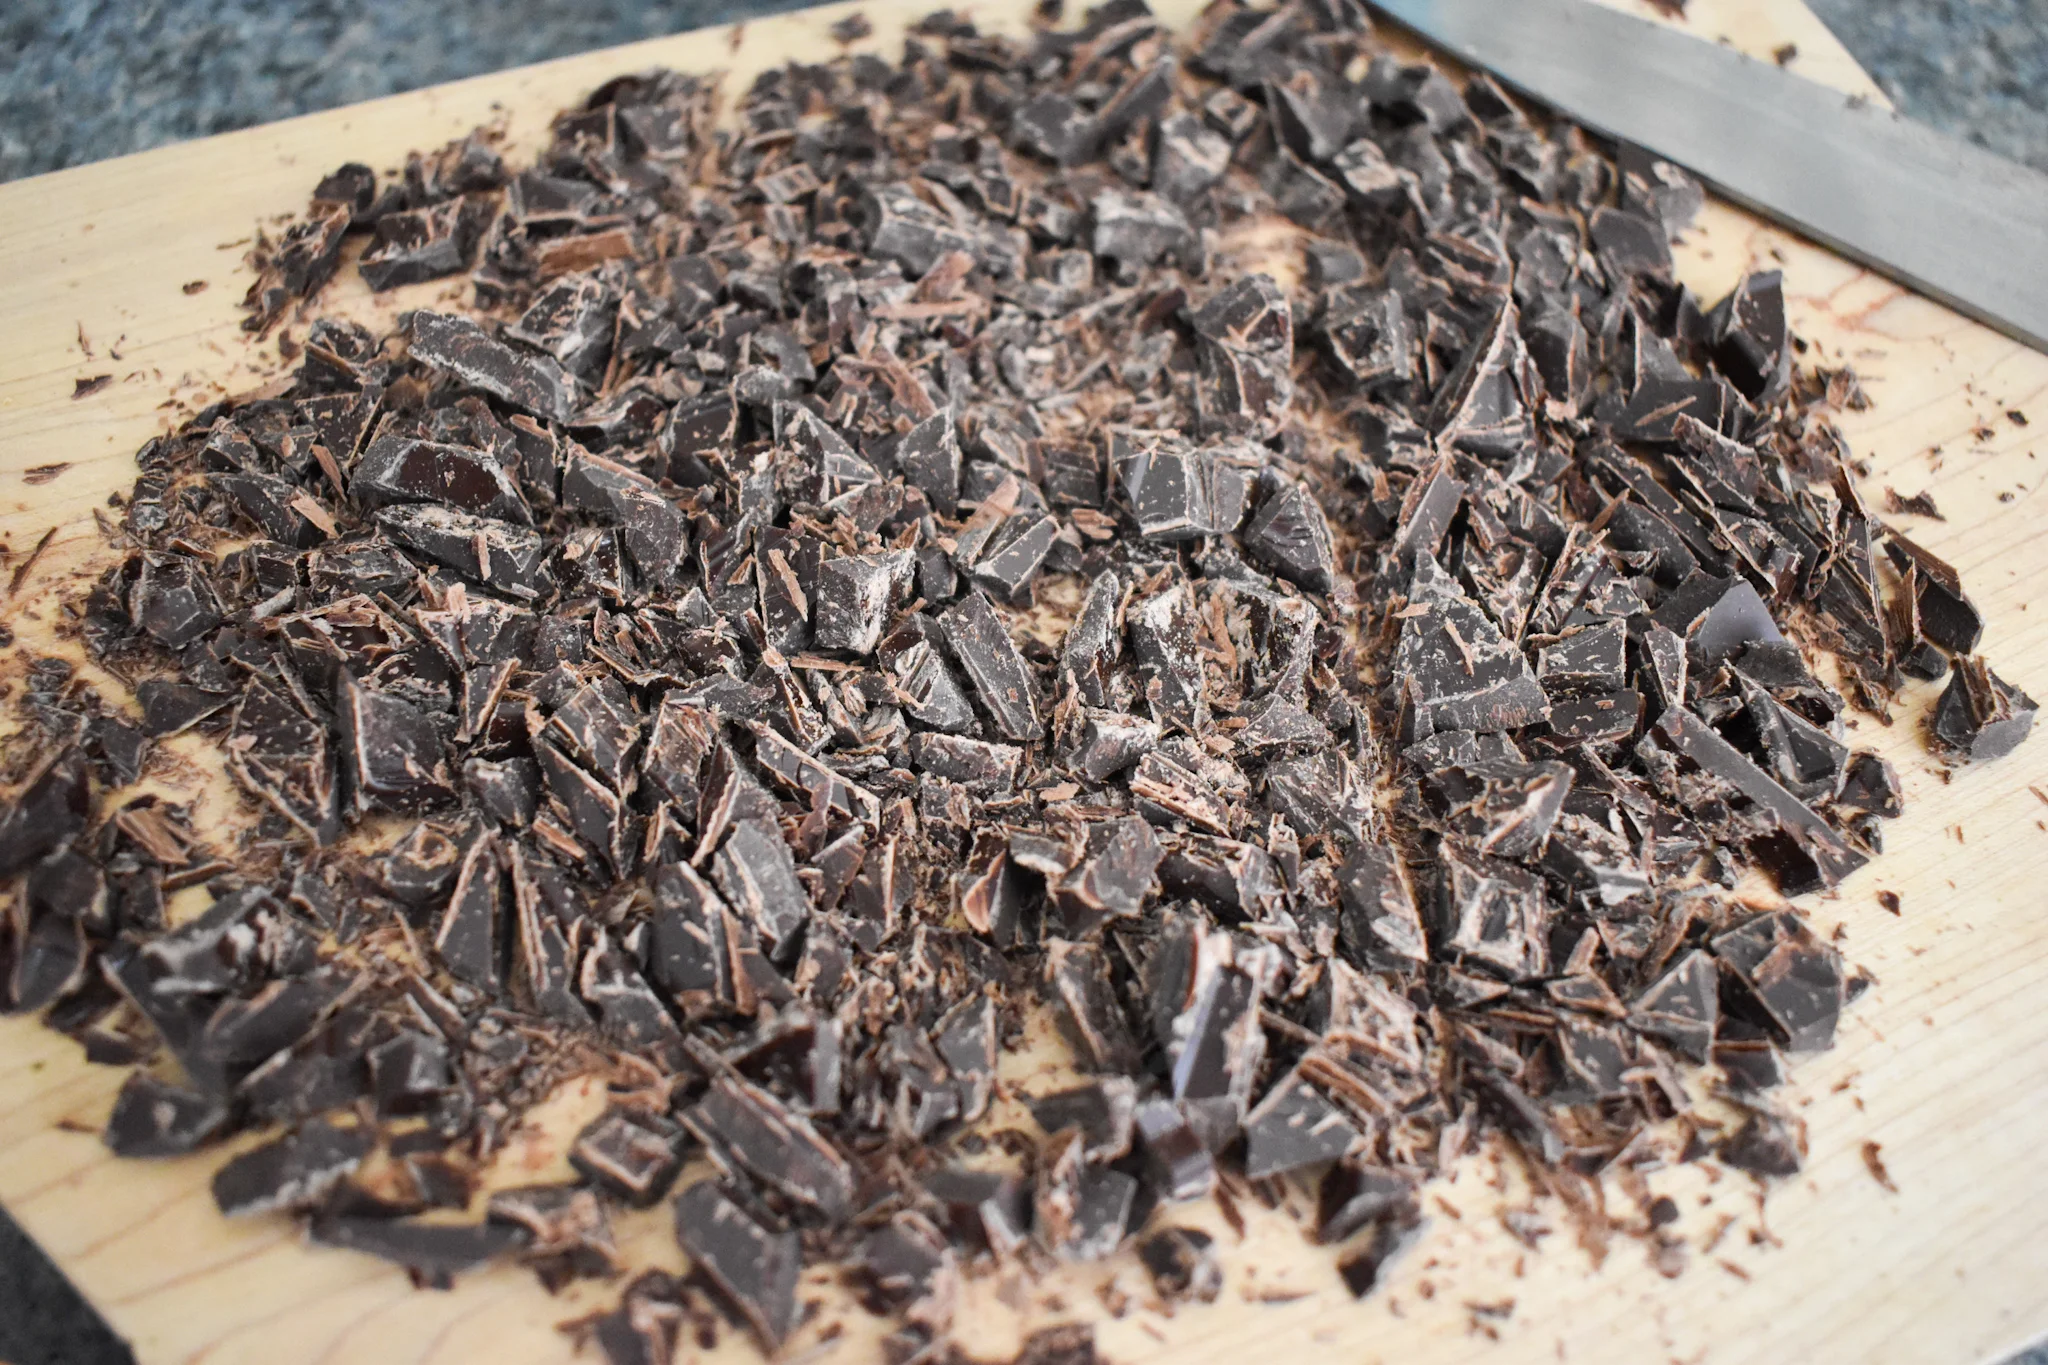
I crushed the hojicha and walnuts with a mortar and pestle and then mixed it with the chopped chocolate!

Truffles are so easy to make, all you need to do is heat the heavy cream and pour them over the chocolate. After letting the chocolate and heavy cream sit for a few minutes, mix well and refrigerate for several hours until solid.

Once the truffles are solidified, take a tablespoon or whatever size you want your truffles and round them out. You can roll the truffles in whatever topping you’d like. I chose coconut! I thought that coconut and the nutty flavor of the hojicha + walnut flavor would go well together.

These truffles are so rich and delicious!

Make sure to use a real chocolate bar instead of chocolate chips. It is so much easier to get smooth truffles this way!

A fair warning, if you do use nuts these will have a little bit of crunch :)

Long Jing Quinoa
Hey There! I’m finally back with another recipe and I thought that it was time to do something savory! I’ve done tea infused rice before so why not try quinoa!

I bought this red quinoa loose from safeway. They have a nice section where you can fill up a paper bag and the cost is by weight. I like how I can just recycle the bag afterwards, no plastic packaging! I want to start off by saying, I’m Persian so rice is like a love language to me but every once in a while I’ll have quinoa.

I had been making my way through some long jing that I got for my birthday and was towards the end of it so I decided to use that. I think this could go well an oolong, hojicha or something like genmaicha or gyokuro as well.
I didn’t have directions for this quinoa so I followed the general rule of doubling the amount of quinoa for how much water to use. Quinoa expands 3 times so 1 cup will make plenty !

The recipe is simply one cup quinoa to two cups water. Instead of using plain water I brewed two cups long jing and used that to cook the quinoa so that it would have a delicious green tea flavor!
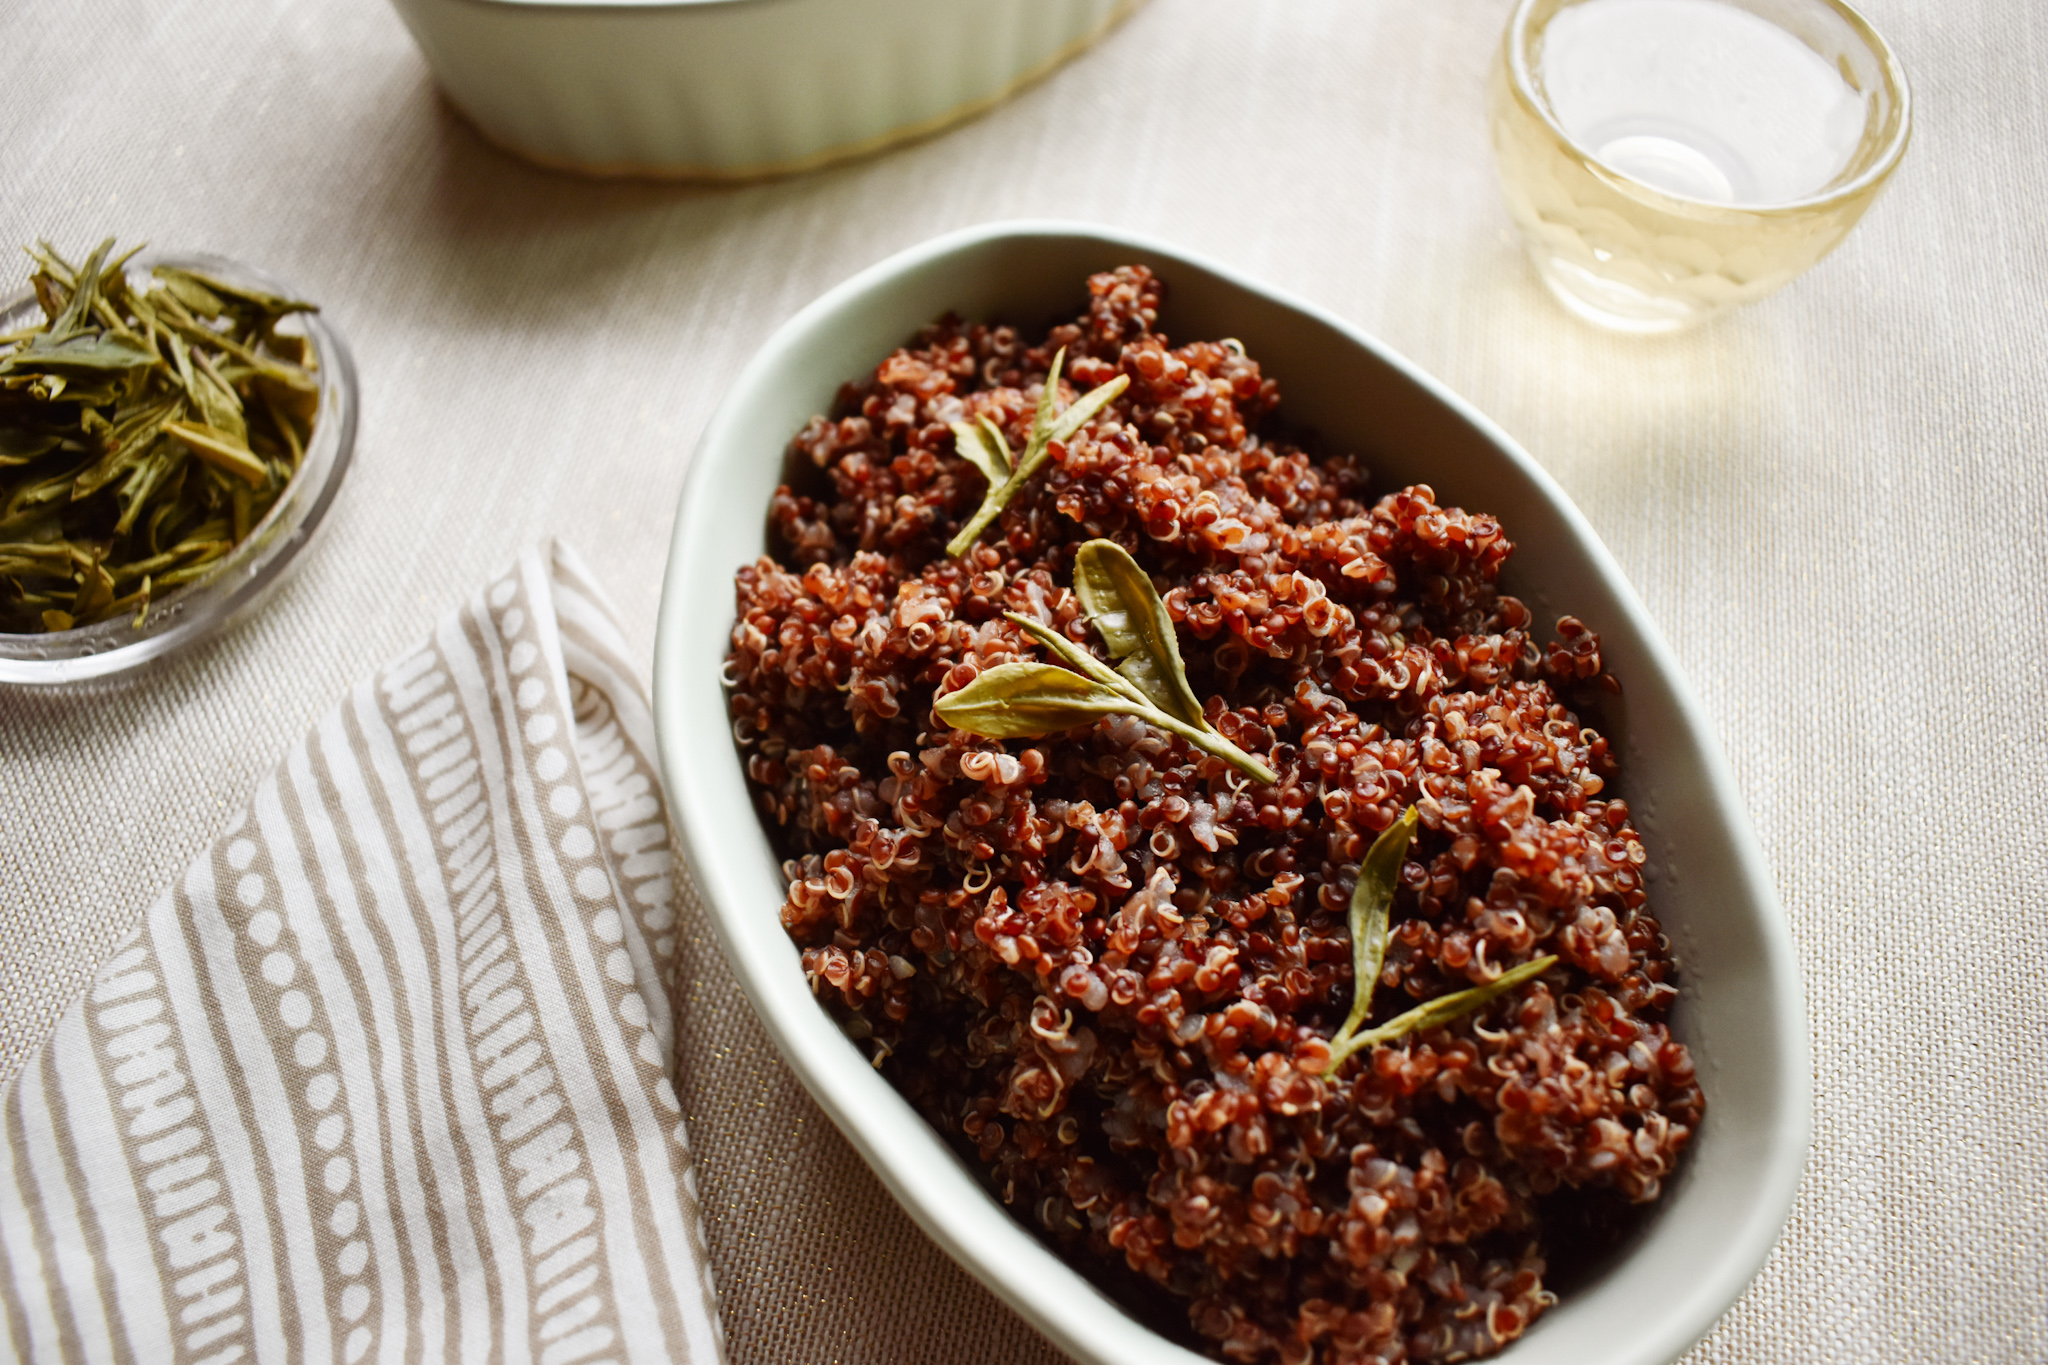
Prepare your two cups of tea, I used this pot because it is so handy! Again, feel free to change up the tea to some of the suggestions mentioned above. Place the 1 cup quinoa and 2 cups tea in a pot. I added a bit of salt, pepper and liquid saffron as well.

With the lid off, bring the pot to a boil. Once boiling, cover and lower the heat and let the quinoa cook until the water has been absorbed (10-20 minutes). Once all the water is absorbed, turn off the pot and let the pot sit with the lid on for another 10 minutes then fluff the quinoa with a fork!

The result is a nicely flavored quinoa with a touch of green tea! The long jing gives the quinoa a bit of it’s roasted nutty flavor !
Voila!
Sencha Margarita
Spring is finally here and I’m excited to bring you a new recipe for a spring themed drink! I got to work with First Leaves tea and their Sencha tea! What better way to celebrate spring than with a green drink?
If you’re unfamiliar with Sencha, it is a Japanese green tea. First Leaves tea’s sencha comes from Fuji City in Shizuoka. You can choose loose leaf or for an easy, on the go solution, the tea sachets. Check them out here to get 15% off your purchase!

Although I made a recipe with this tea, I highly encourage you to brew the tea first to try if you’ve never had sencha! When it comes to brewing in this recipe, you can do either brew it hot and let it cool down or cold brew in advance.
If you want to cold brew, run warm water over 2 teaspoons of leaves just to wake them up a bit. Place the leaves in a container and fill with 2 cups of water and leave in the fridge for about 12 hours. Make sure to taste it after 12 hours to see if the flavor is strong enough, if not you can leave it a bit longer.
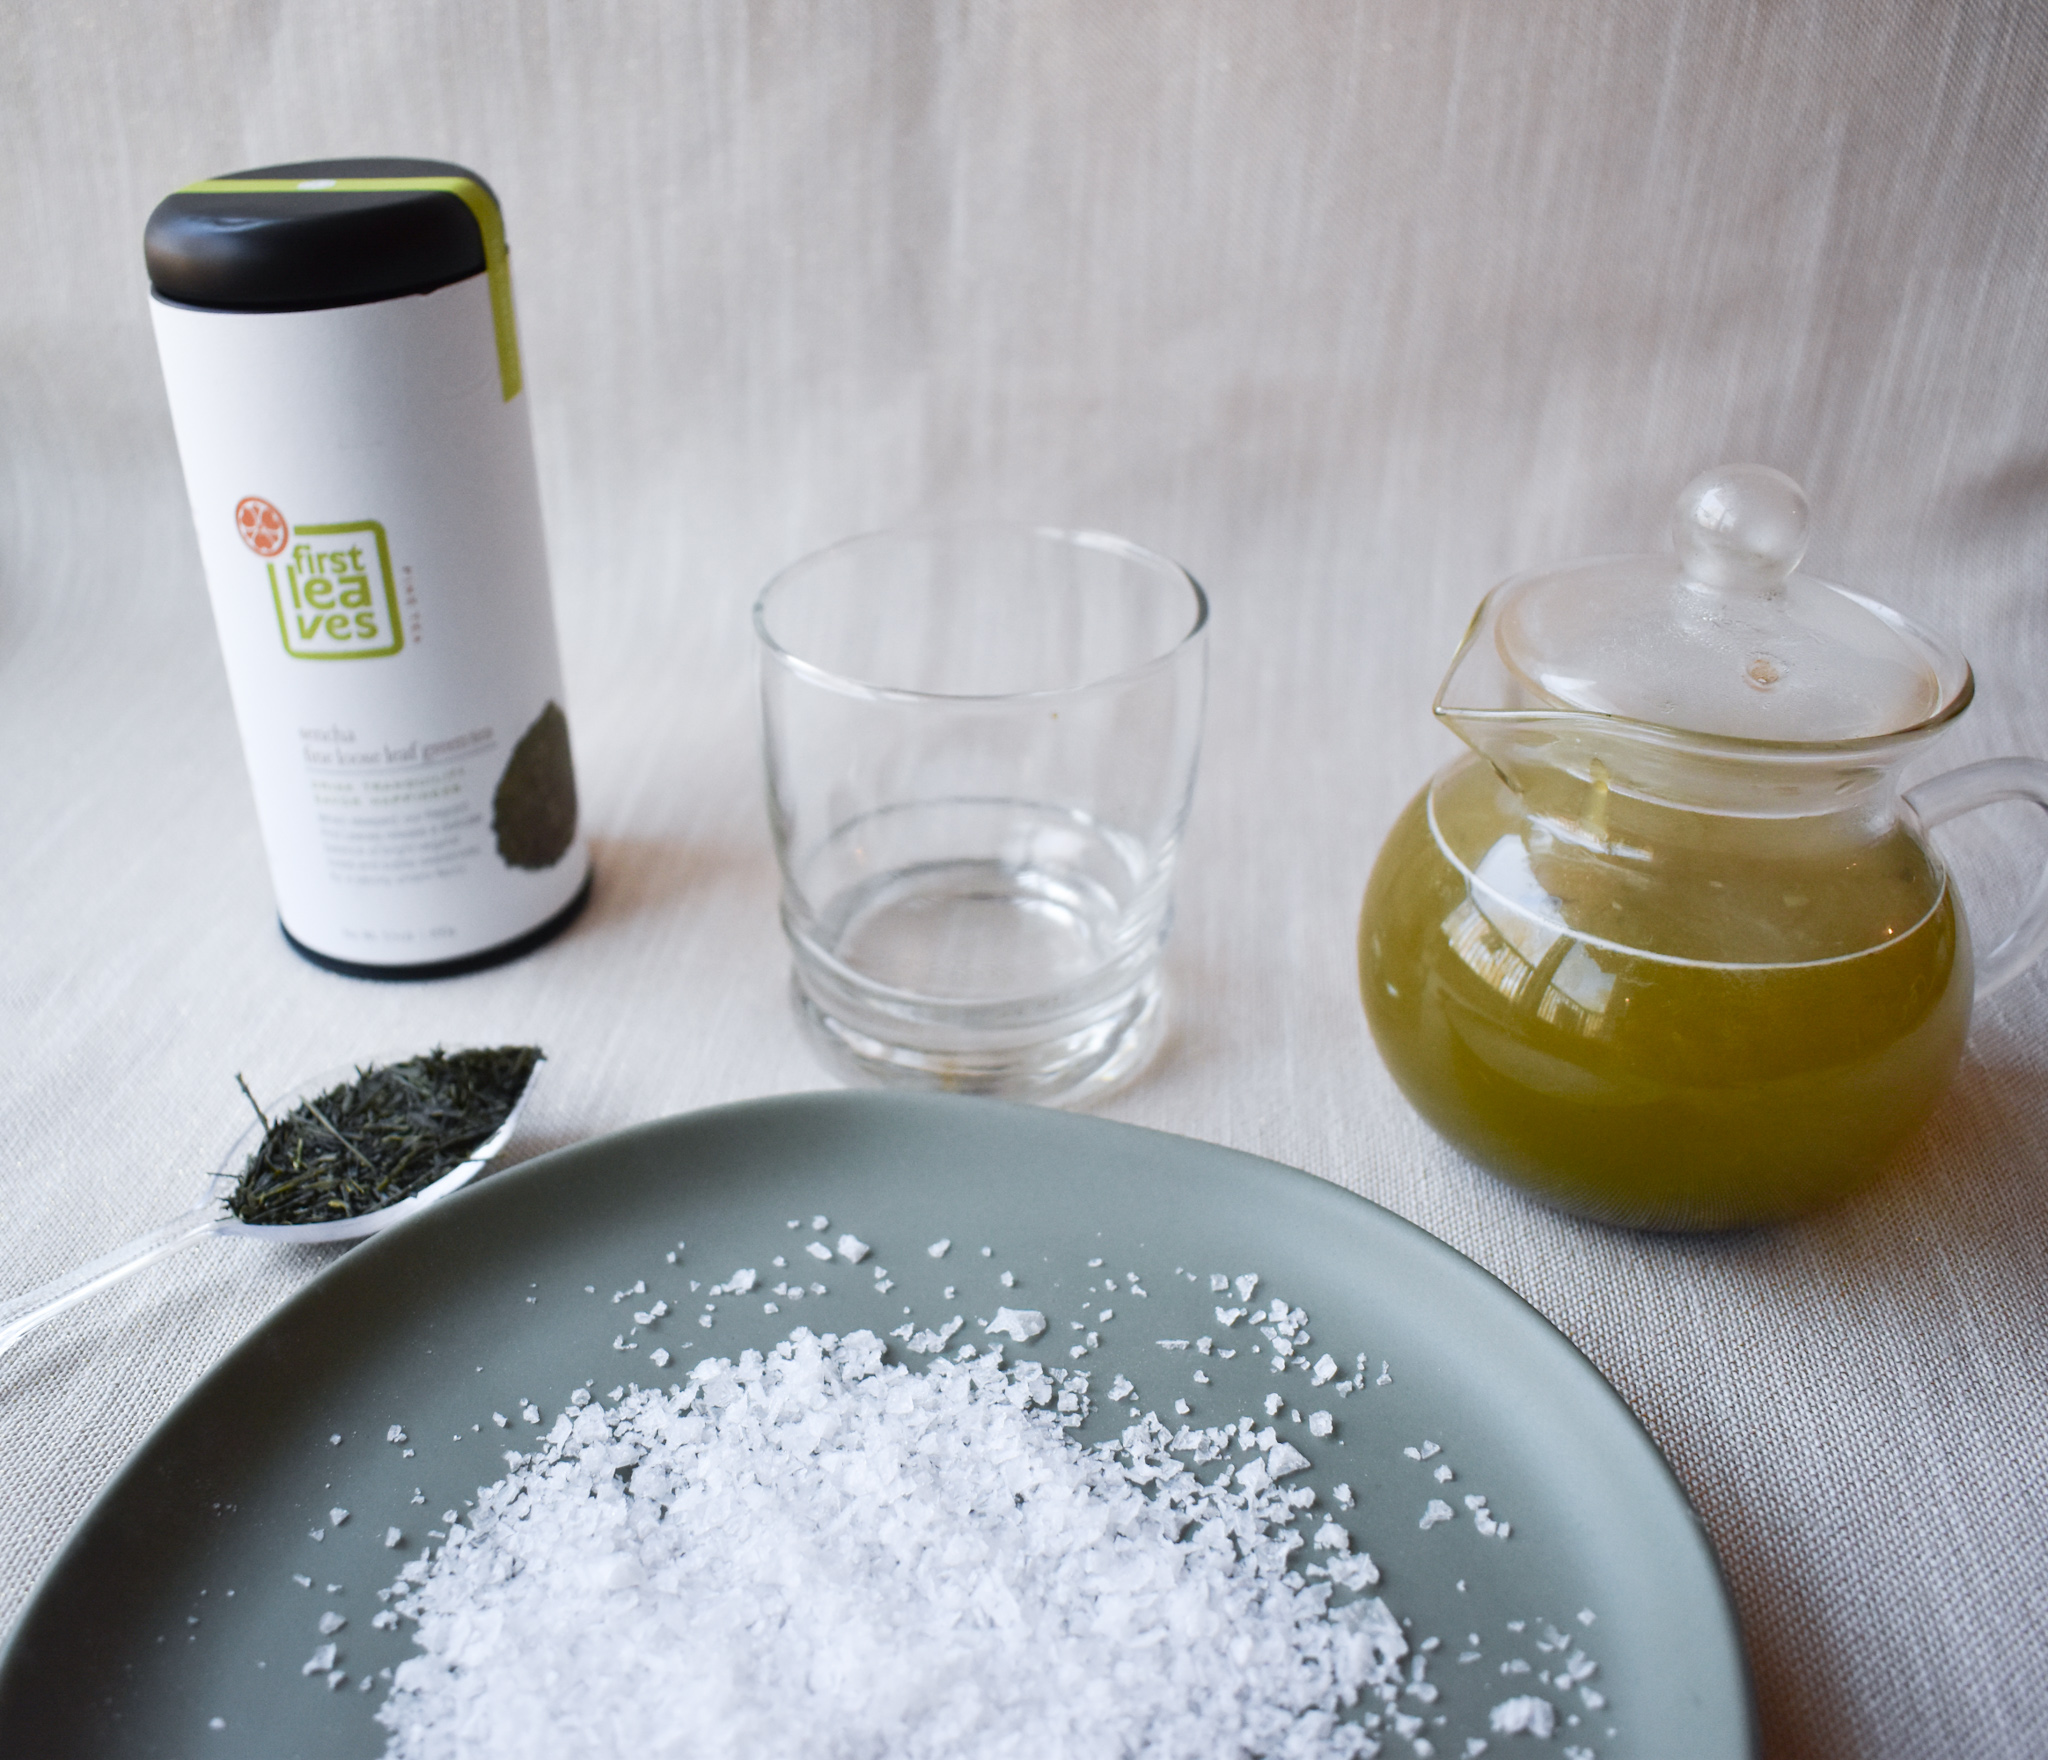
The way I brewed the tea for this recipe was with hot water and let the mixture cool before creating the drink. The tea pot that I used (pictured) can hold about 2 cups of water and it is suggested to use about 1 teaspoon per 8 oz so I placed 2 teaspoons of loose leaf sencha in my tea pot.
At this time, I also placed the honey that I used to sweeten the margarita in with the leaves. I normally wouldn’t sweeten tea this way but it’s nice for the margarita to have a little bit of sweetness to it!

Brew the your water to no more than 175 F. It is really helpful for teas like sencha to have a kettle that shows the temperature. If you don’t have one don’t panic! You can let the boiling water stand for a little bit, maybe 5-10 minutes and it should cool enough to use.
Pour your water into the tea pot with the leaves + honey and brew for 30-40 seconds. Give it a stir so that the honey dissolves and strain your tea!

Let the tea cool enough to use in your drink! You can refrigerate it to speed up the process or use ice in your drink to wait less time. I wanted to note that I used a matcha honey in this recipe because I had it and thought it might be fun but it is not a necessity!
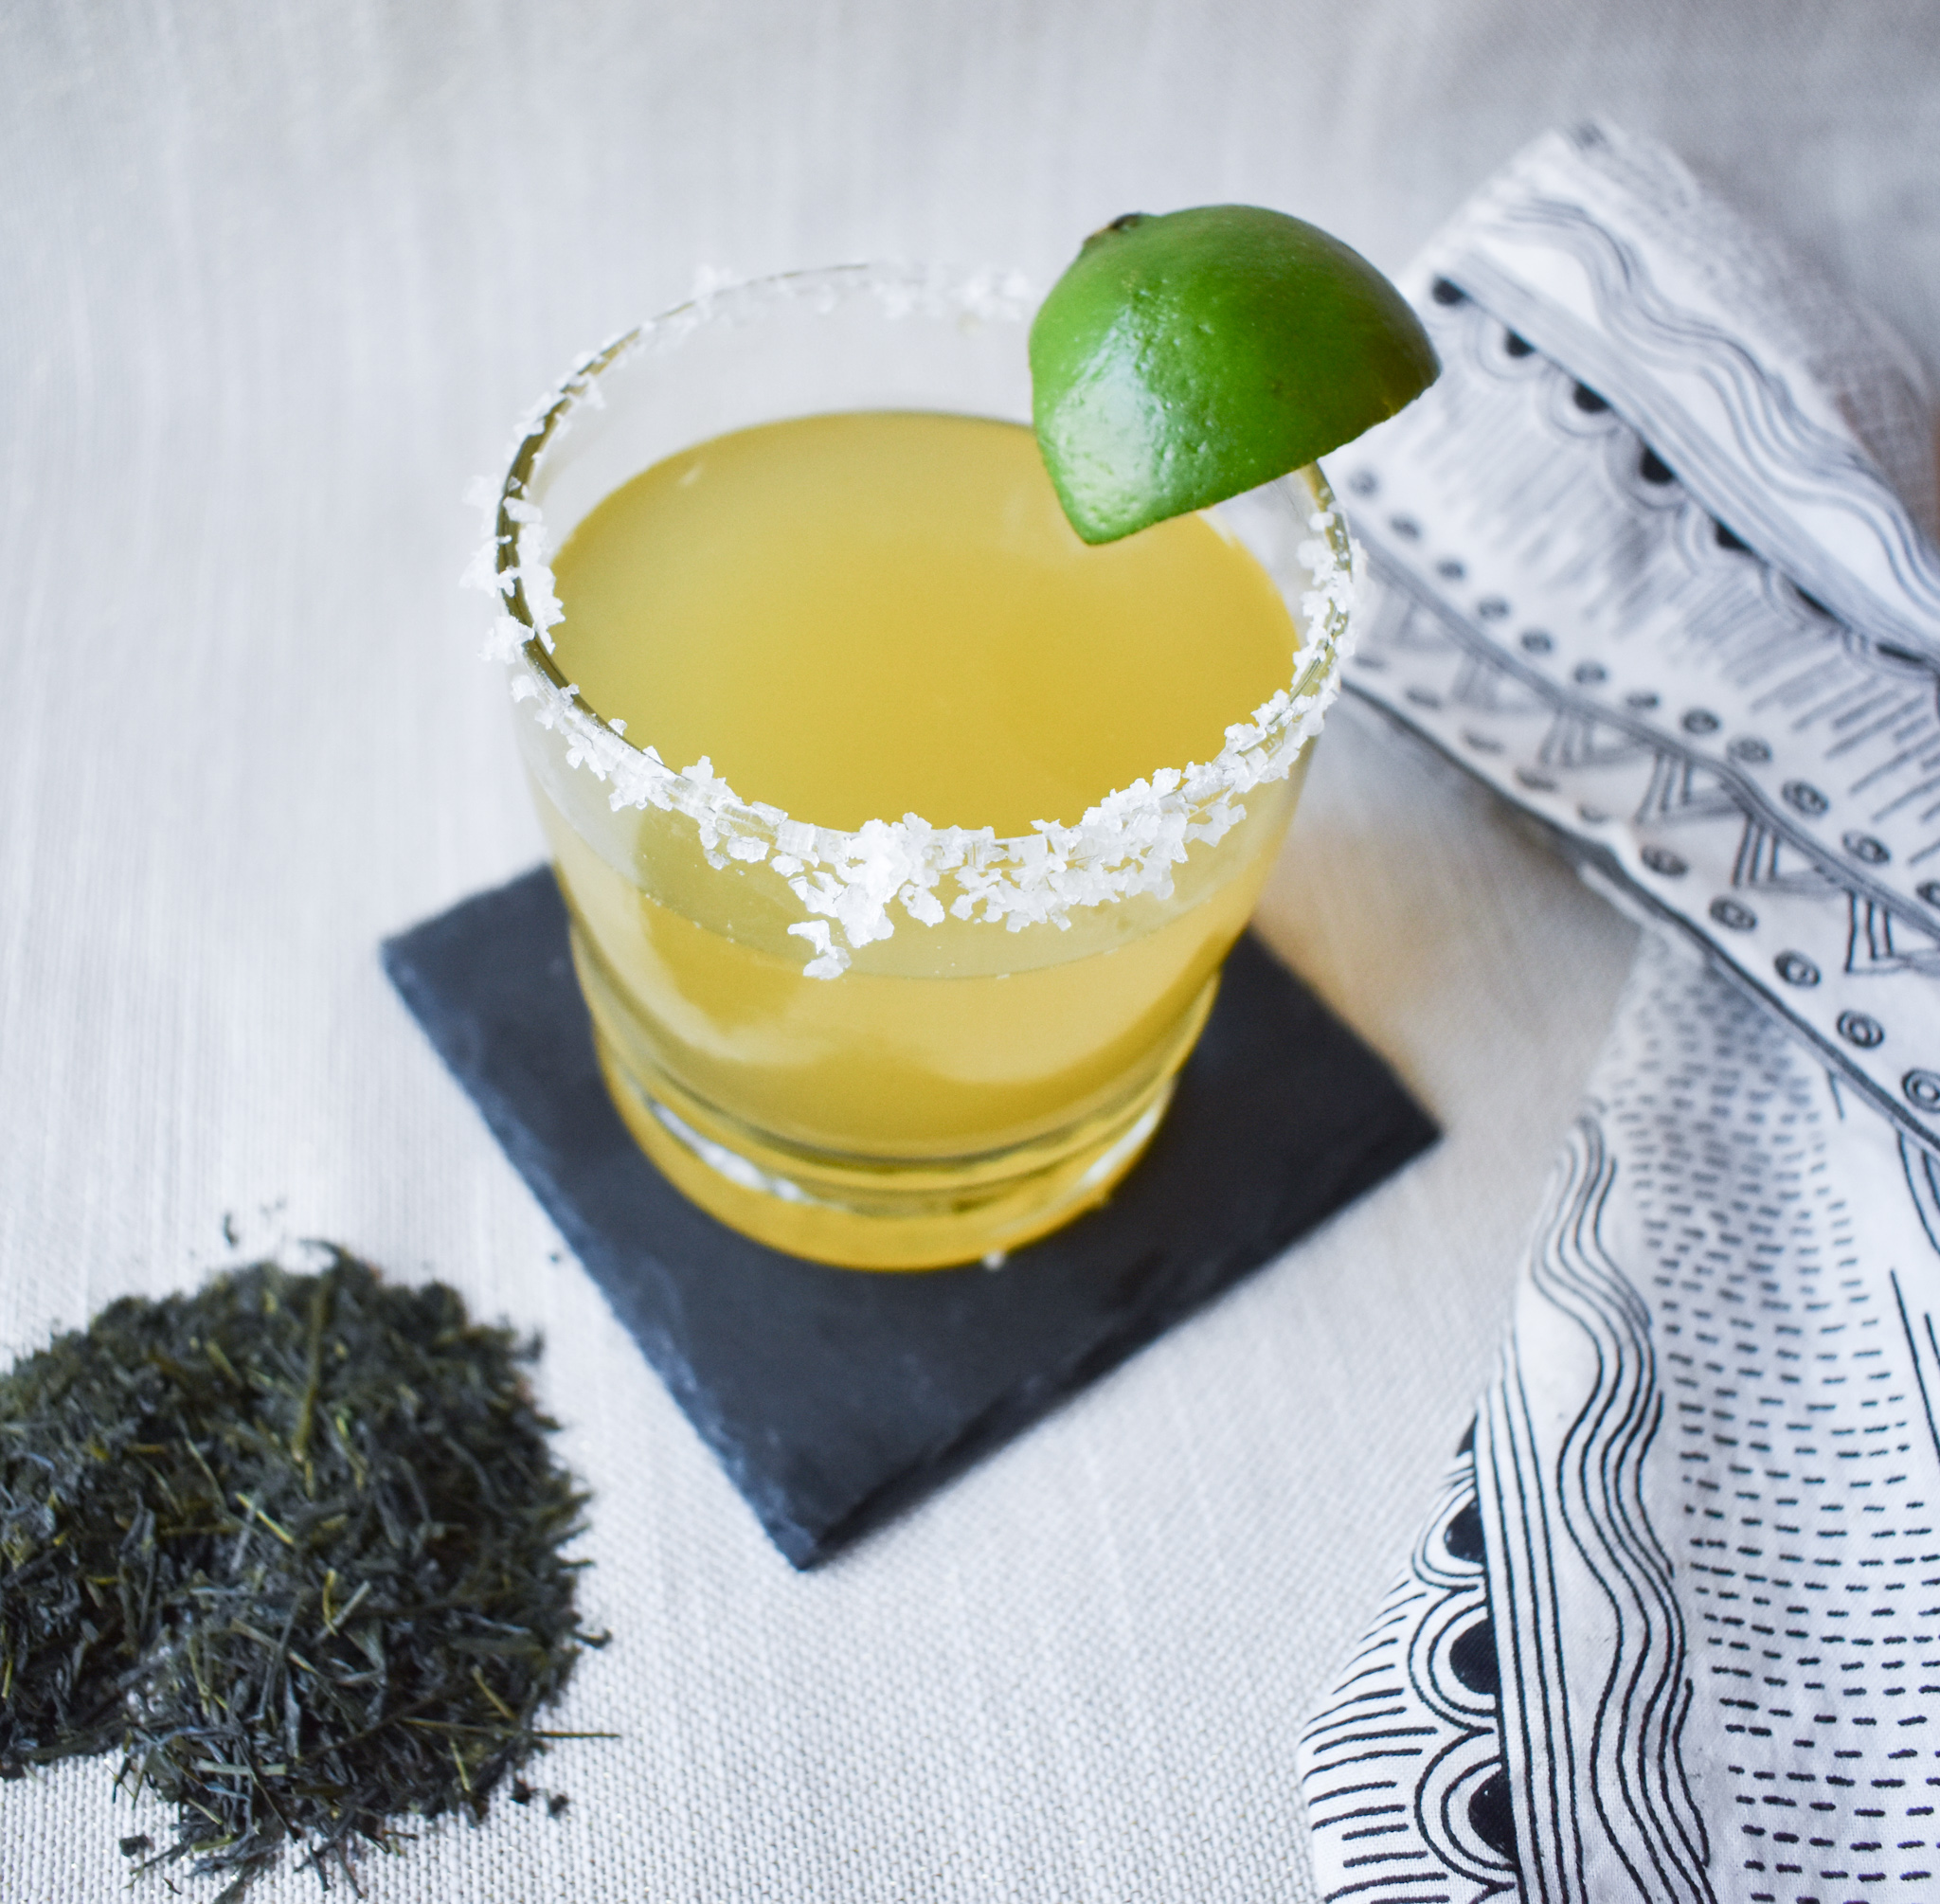
Salt! Who doesn’t love a salt rim?? If you don’t, skip this part :) If you do, take a lime wedge and wet the rim of the glass and then dip the glass in a plate of salt. What salt to use? You don’t have to have that margarita salt that you see at the store. If you don’t have that, you can use most sea salts that aren’t fine grain and they’ll work well. I used maldon sea salt flakes I had for this drink!
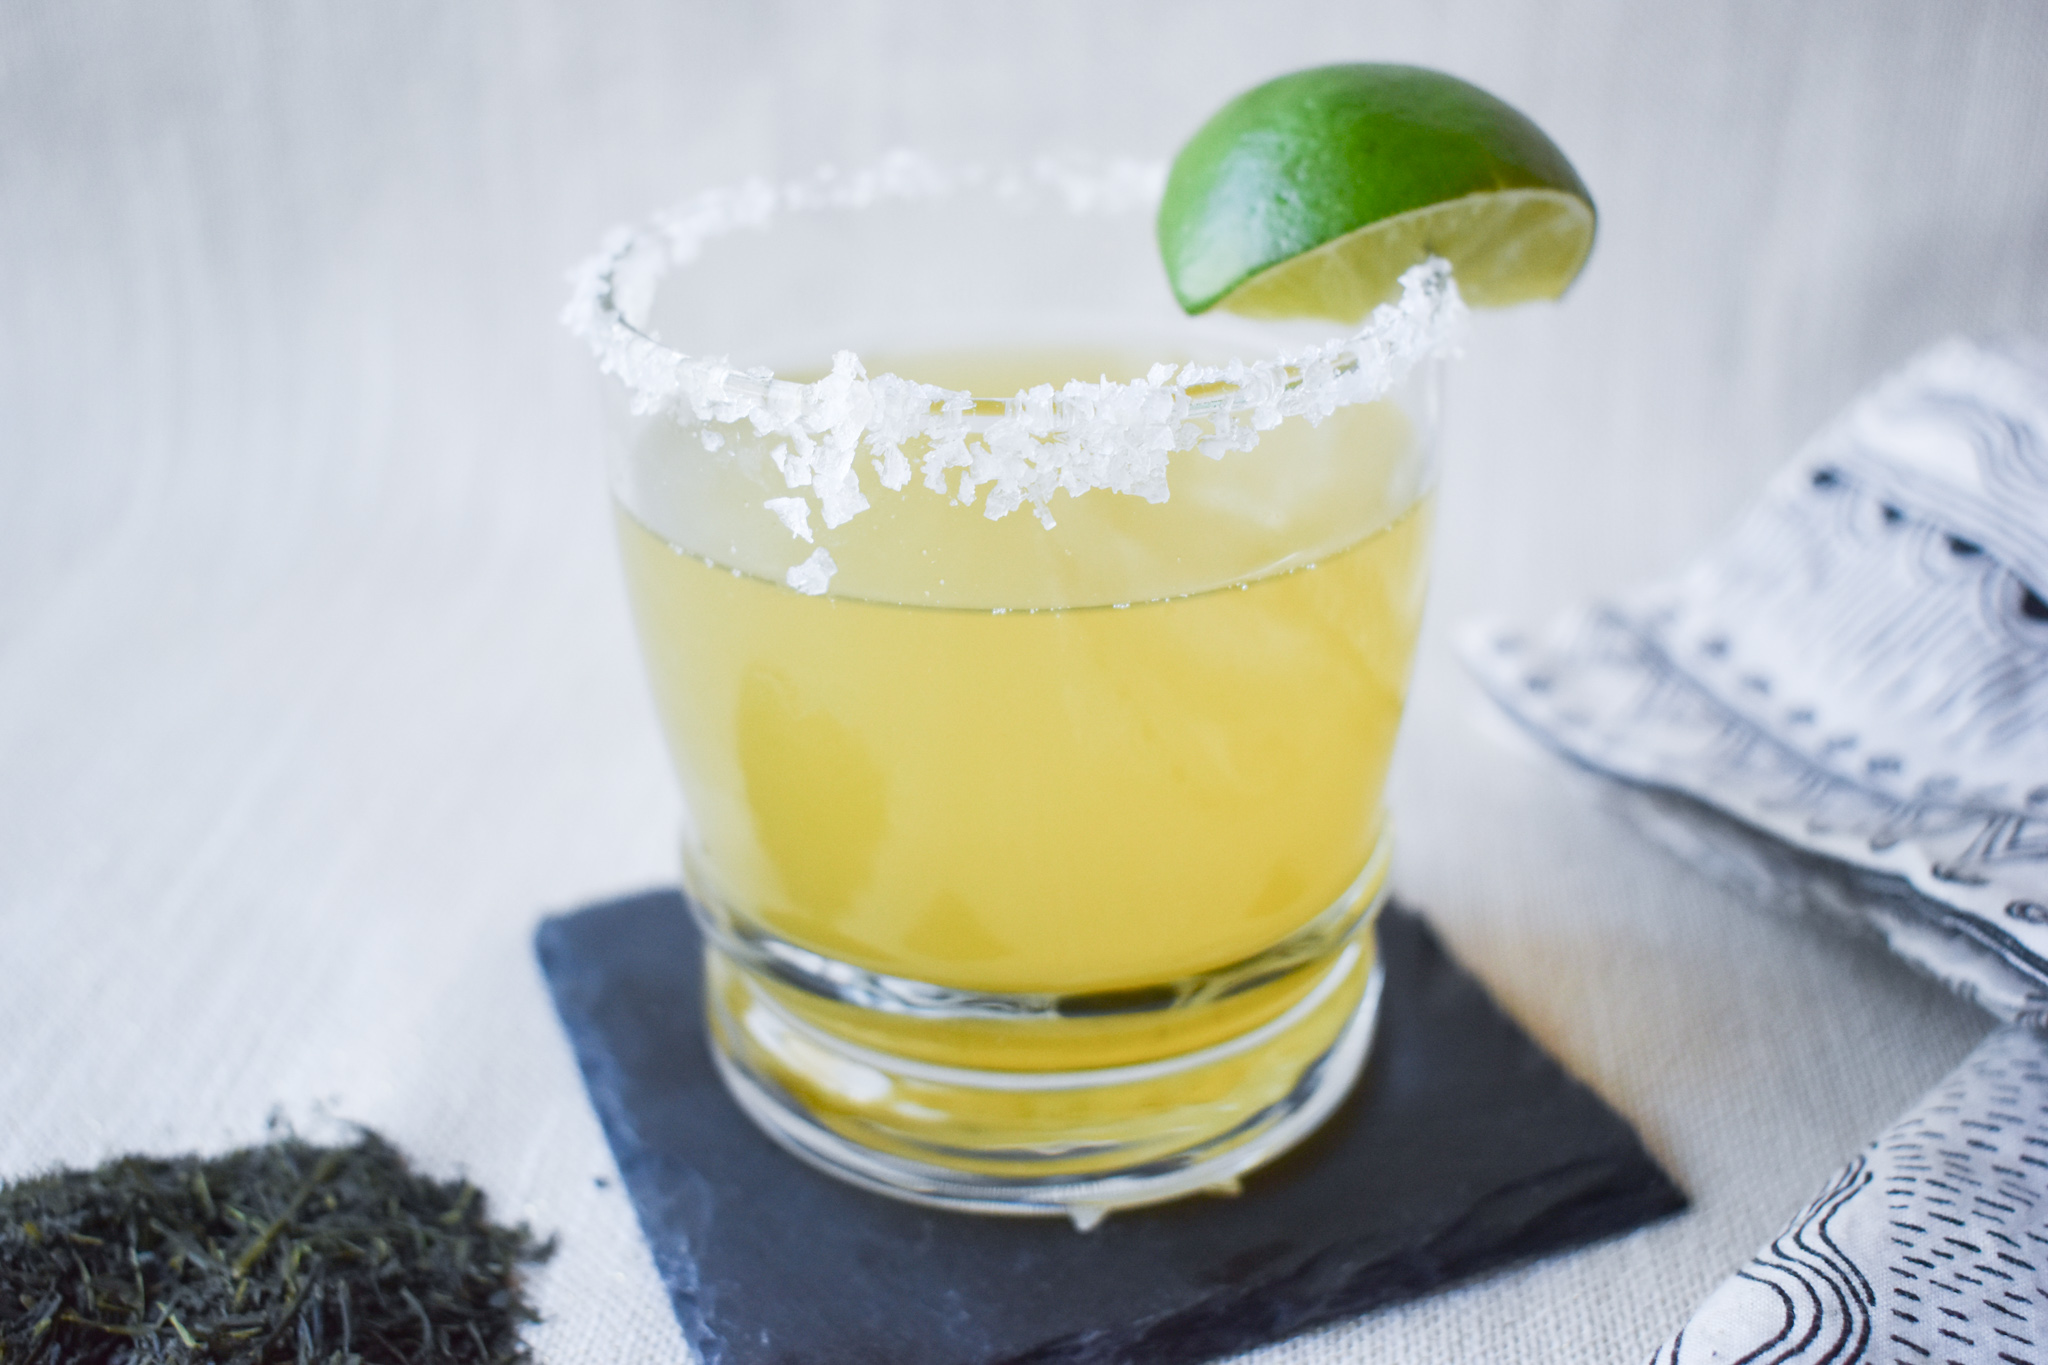
In your salted (or non salted) glass, combine the juice of half a lime + 1.5 oz of your favorite tequila! I used Altos tequila. It is my go to because it’s priced well and tastes great in margaritas! I also love espolon tequila!
Please feel free to alter amounts of lime + tequila to your liking!
Finally, fill your glass up with the sencha + honey brew, mix, garnish with a lime and enjoy!

Genmaicha Herbed Biscuits
So I totally love valentine’s day but I’m also a believer in showing the people you love that you love them everyday! What better way than with some delicious herb biscuits infused with genmaicha that are heart shaped!

Feel free to use whatever herbs you’d like but I used rosemary, thyme, dill and some garlic. I chopped them all together using a food processor!

I found that folding the dough is really important to get a tall and flaky biscuit!

These biscuits are so cute, buttery and the herbs add an incredible taste!


Start off by heating the oven to 450 F
Heat up the milk and when it starts to bubble, take it off the stove and mix in the genmaicha tea and let it sit for a minute then strain and set the milk aside for use later in the recipe.
Mix together the dry ingredients and the fresh herbs mixture!
Make sure the butter is cold and cut into cubes. Cut the butter into the flour mixture with a pastry cutter, 2 knives or even your hands! You want the butter and the flour to resemble crumbs but make sure than not ALL the butter is totally mixed in!
Add in the milk and stir to combine then take the dough and put it on a floured surface.
You want to take the dough and fold it half then smooth our a bit. Do that a few times and this will give the biscuits some volume!
Don’t roll out the dough, pat it down and then take a heart shaped cookie cutter and cut out your shapes.
Use some parchment paper on a baking sheet and cook the biscuits for 12 to 15 minutes or until golden brown!
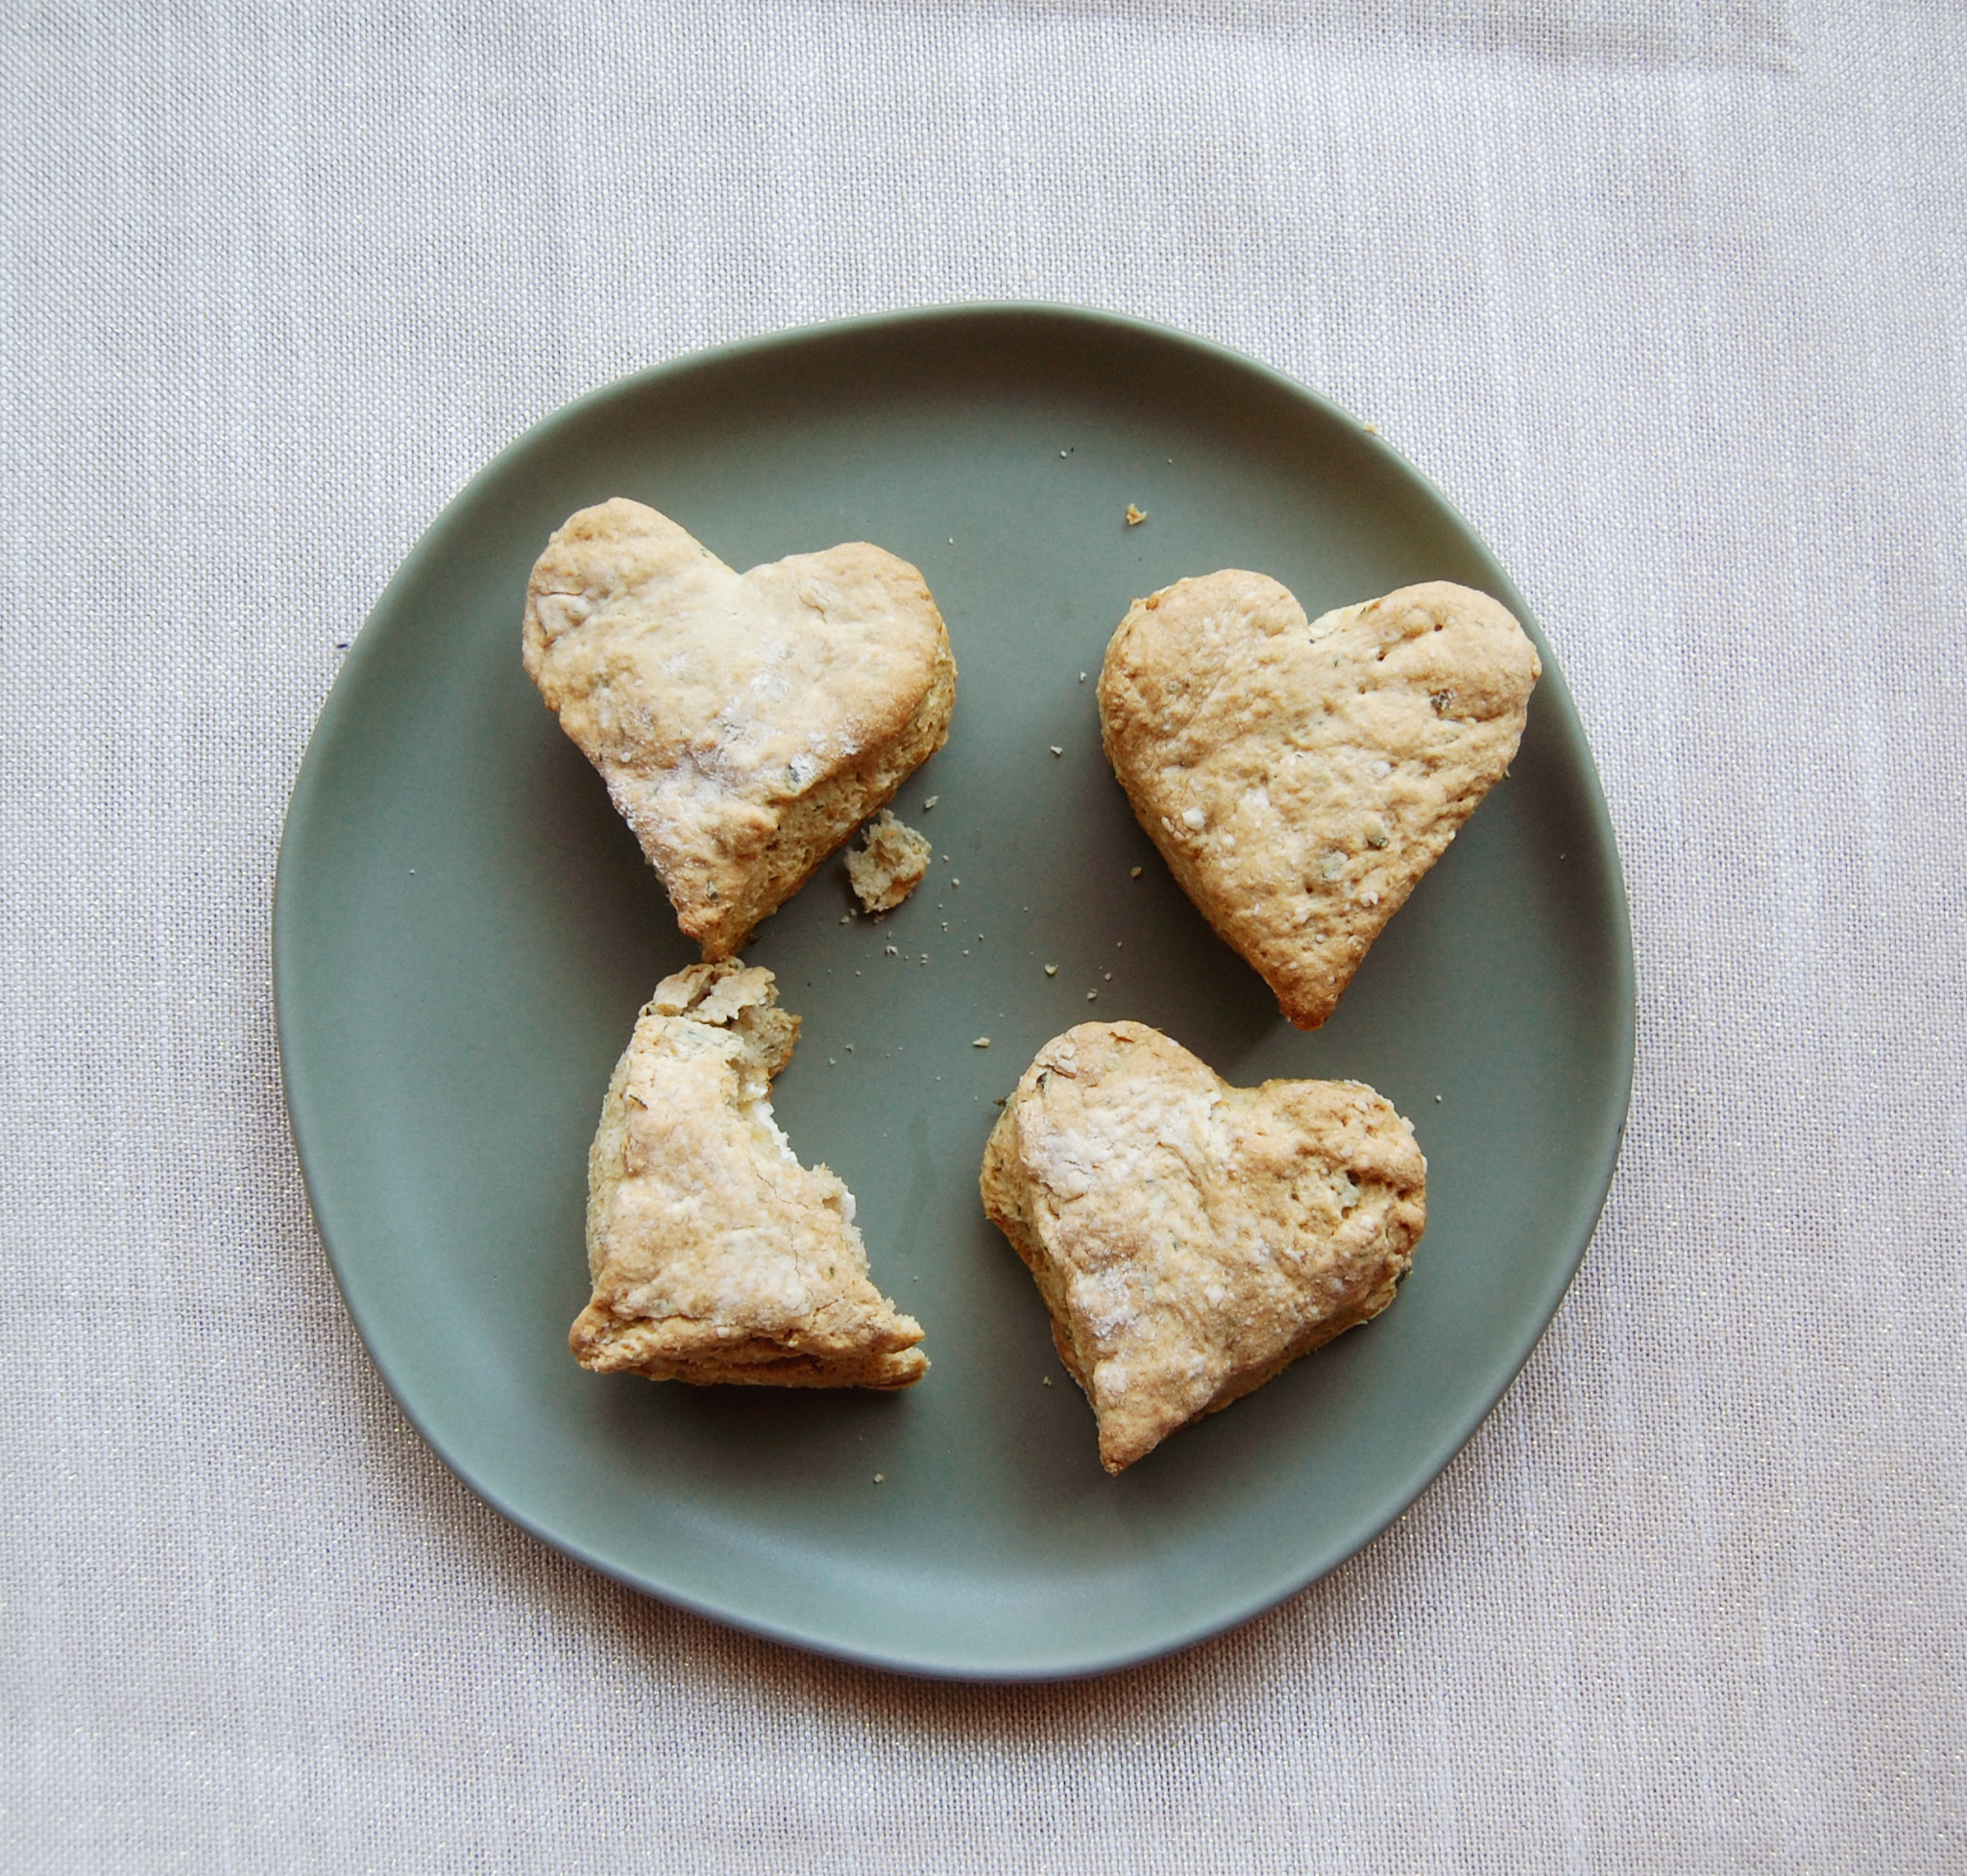
These are really good with butter or probably with any other savory topping! I personally could have used a bit more salt in these biscuits so I suggest enjoying with salted butter or irish butter!


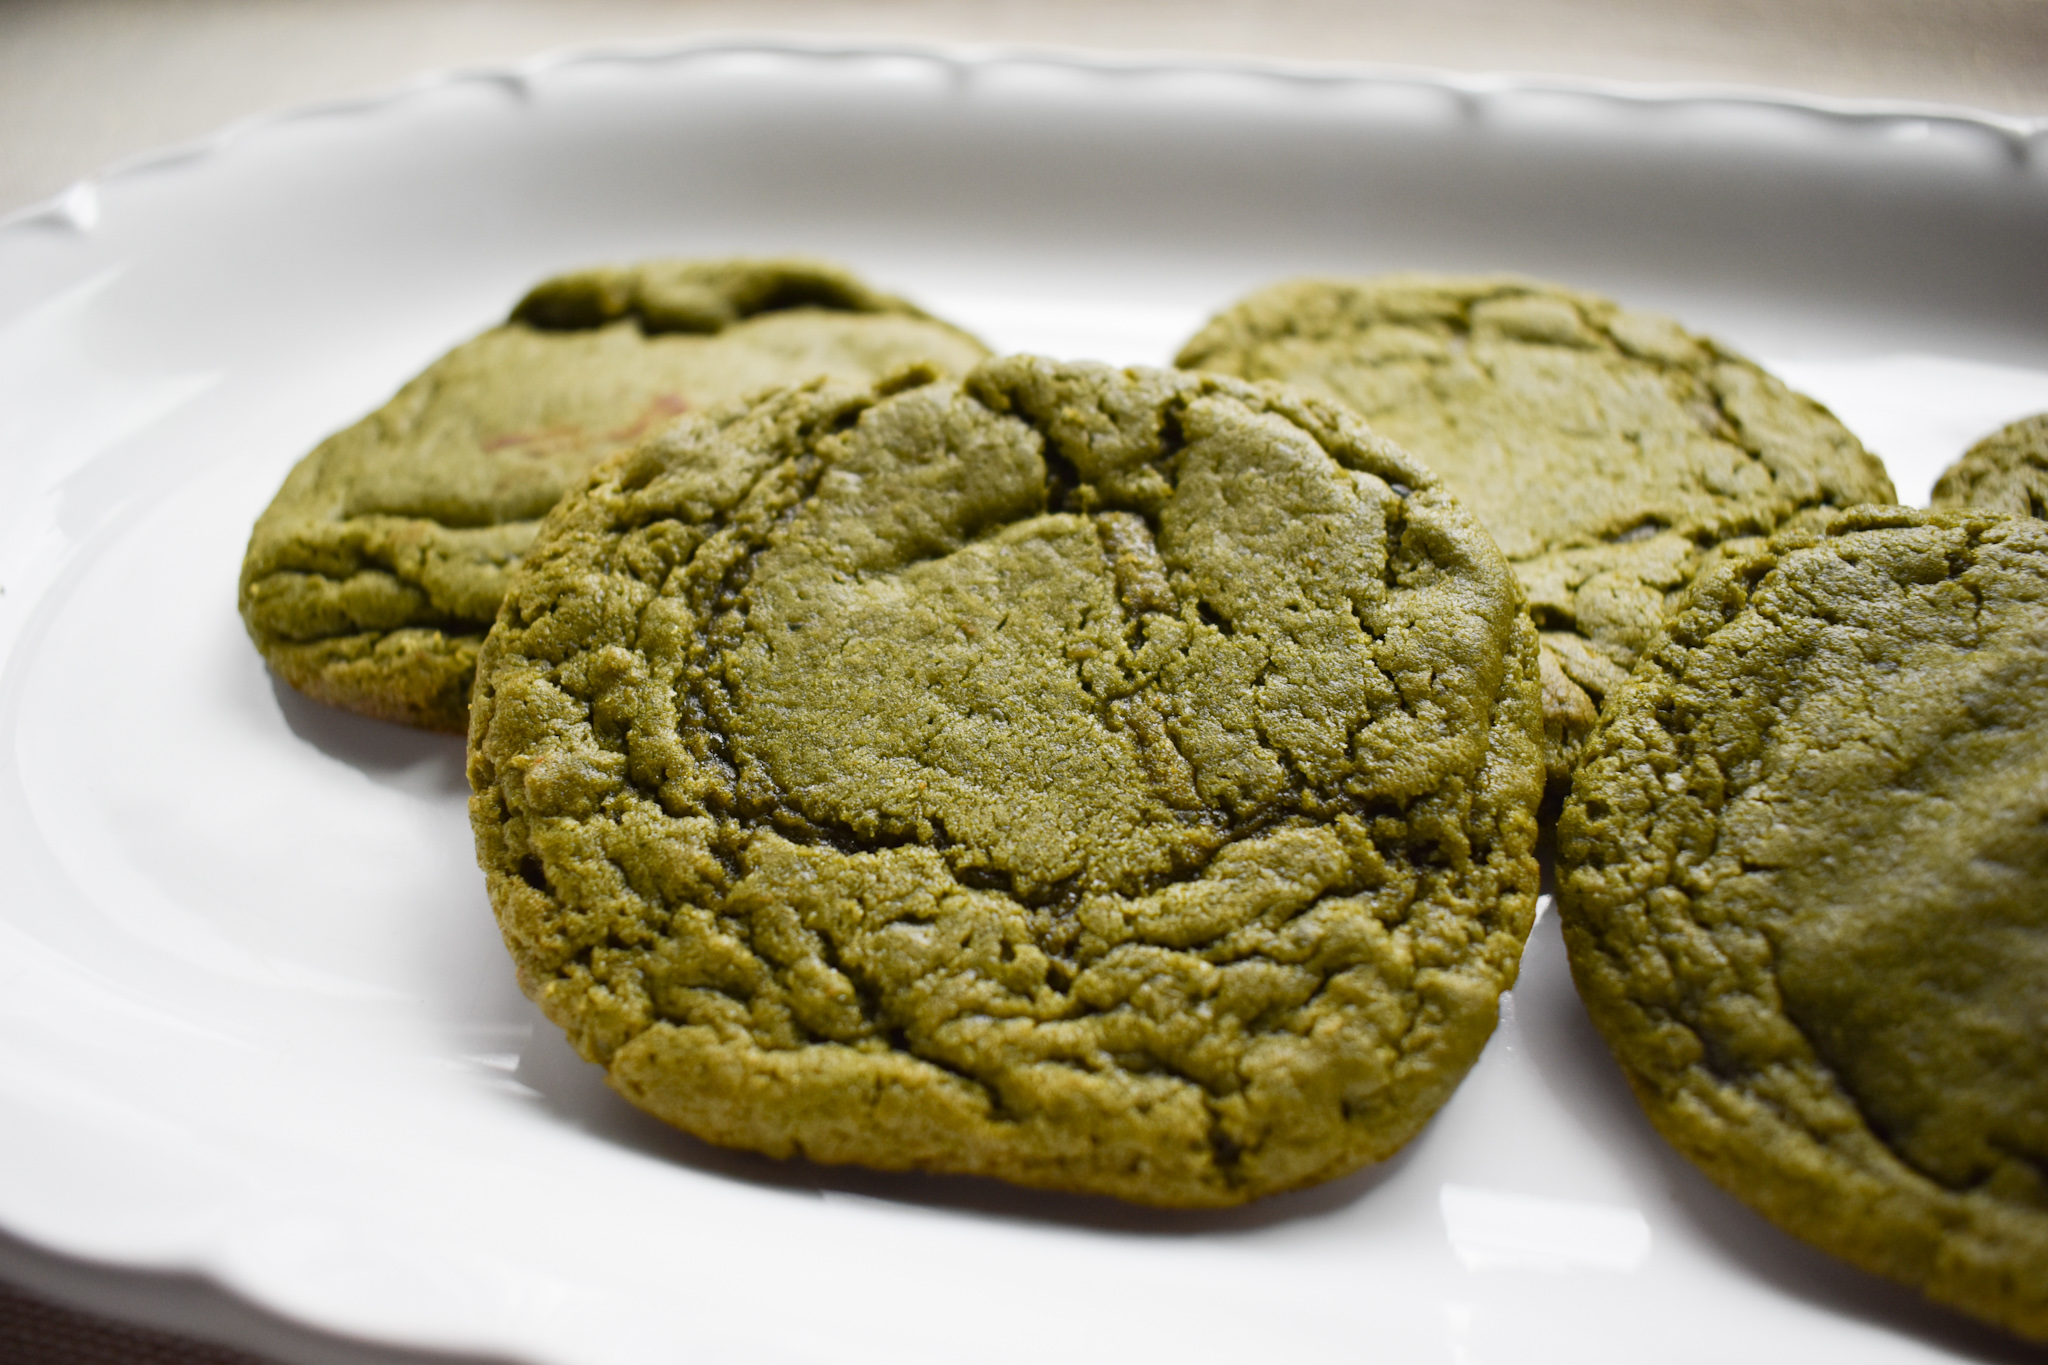
Matcha Miso Cookies!
Green Cookies?!
I often talk to people about matcha and many people want to consume matcha in other ways besides drinking it. I love the ceremony around whisking a warm bowl of matcha. But, there is also a place for matcha in our food. Many recipes include infusing which is pretty simple, but nothing is simpler than putting matcha in food and drinks because all the work has been done for you. Matcha being in powder form allows you to be able to incorporate it in everything more easily!
If you’ve read this blog and the recipes in it you probably can tell I’m a bit of a fan girl of Adriana over at A Cozy Kitchen. I one time made these cookies from her blog that were miso white chocolate chip cookies. They are amazing! When I was looking for a simple recipe to get me back into blogging and I thought that matcha would be such a delicious flavor with the miso!
I want you to check out her original recipe because this is such a cool concept for a cookie and she deserves all the credit! While you’re there make sure to check out some of her other delicious recipes!
Miso White Chocolate Chip Cookies Recipe (since changed to chocolate chips)
I only changed a few things to get these cookies to be green!
-I used all brown sugar instead of white and brown
-I used bittersweet chocolate chips, only because I personally am not a fan of white chocolate. White chocolate chips do have a nice flavor though with the miso and matcha
-I added about 2 tablespoons of culinary grade matcha
One more note about these, Make sure to check them because the bottoms get browned very quickly, adding another layer of parchment paper helped too!

These cookies marry the delicious taste of miso and matcha but with a sweet harmony. You get the bite of matcha but you still feel like you’re having dessert! I think that if drinking matcha isn’t your favorite and you still want to have matcha in your life, this might be the recipe for you ;)

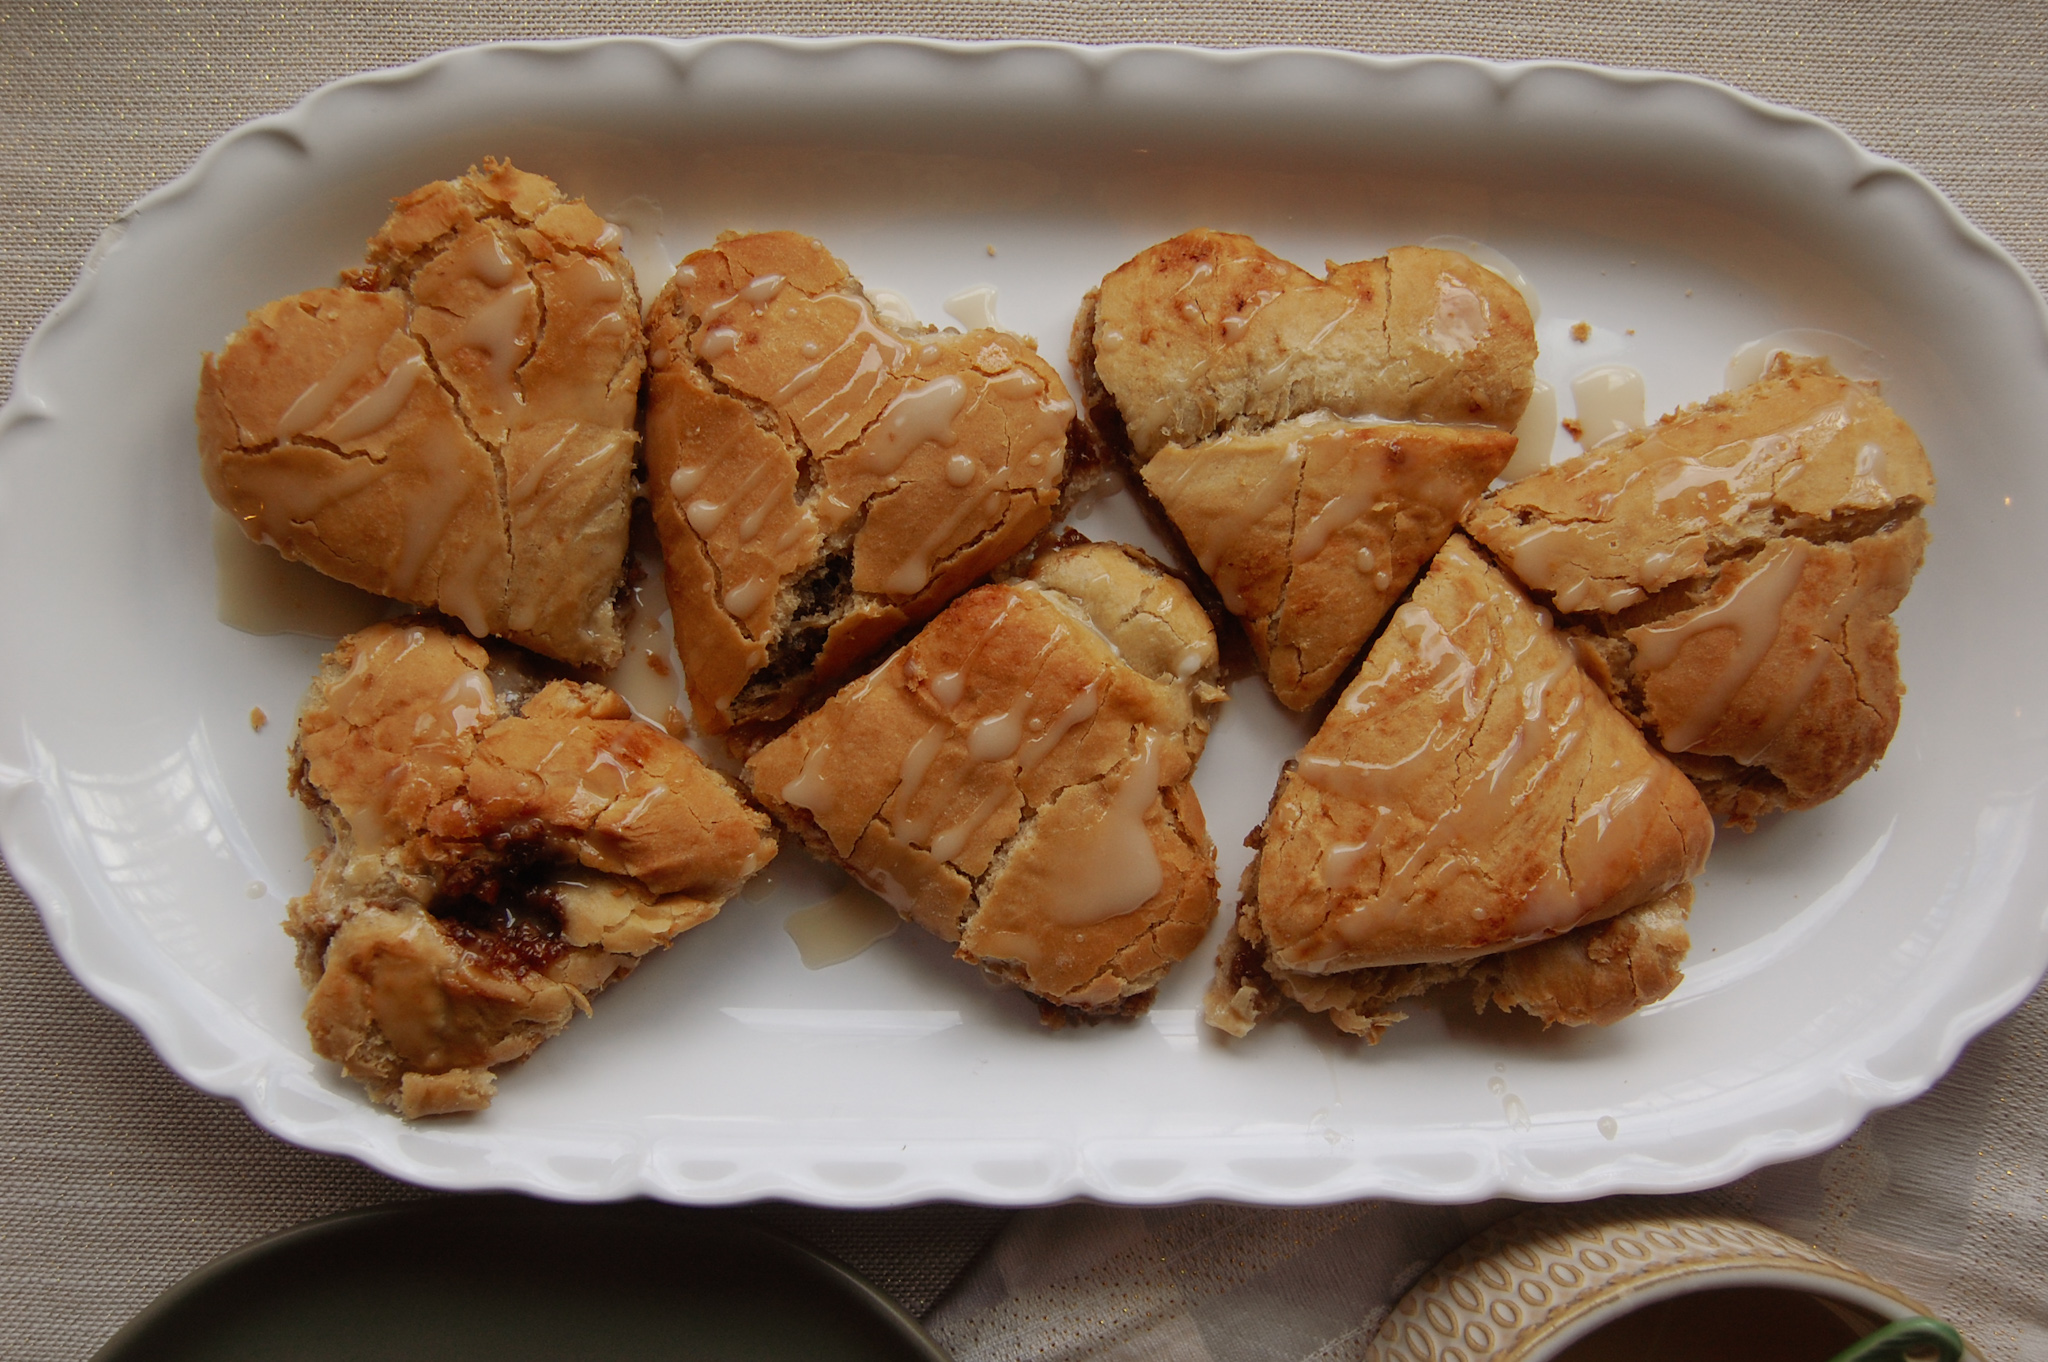
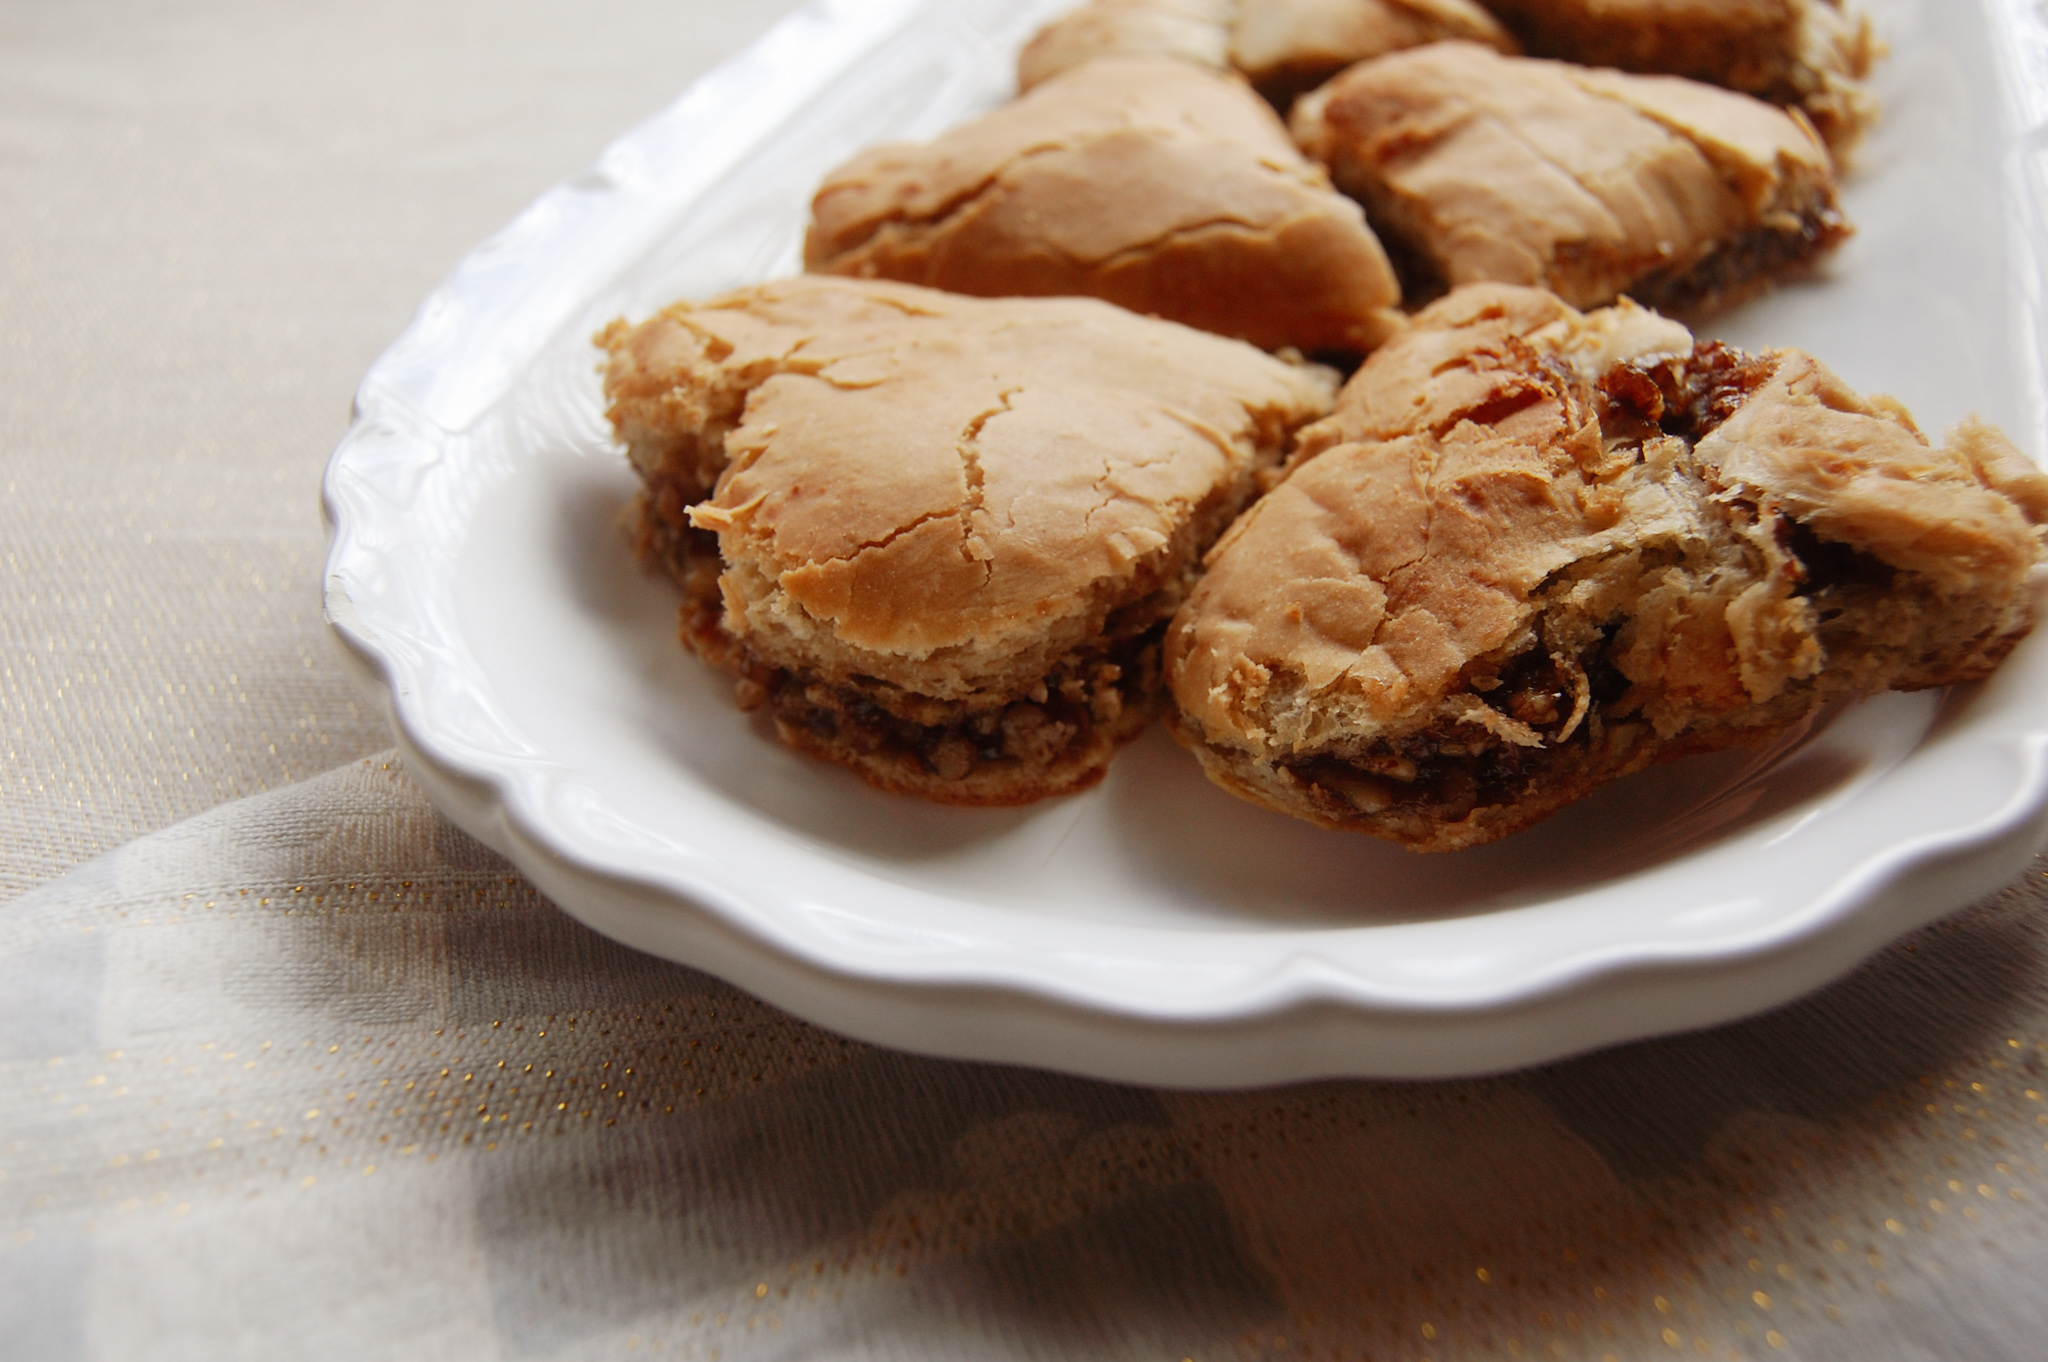
Tea Infused Kringle Hearts
Hello!
Small Announcement: I’ve missed you all! I have to admit some sad circumstances have stopped my blogging for most of December and all of January. In December, my stepdad passed away suddenly and it affected me more than I could ever have imagined. I wanted to keep going everyday which I did to a certain point but creating recipes and blogging is such an involved process and I wasn’t up for it. I appreciate your patience during my little break and I’m back in time for the holiday of love!
I have mixed feeling about valentine’s day but I always try to be positive about it AND it’s an excuse to bake and cook things with hearts!
Have you ever tried Kringle?? I bought one from trader joe’s around the holidays and OMG SO GOOD! After I bought that one I couldn’t find them again :( I found out that you can order them online but they are a little pricey.
I was sure I could find a recipe on the internet, and I did! I used this recipe for these kringle hearts and will let you know the changes I made and how I added tea!

For those of you know kringle, you’re probably thinking that this isn’t the right shape! Well, you’re correct. I actually created the kringle then used a heart shaped cookie cutter to cut these out. It was messy but worth it for valentines day! The heart shape doesn’t change the taste in anyway :D

You can find the recipe I followed here !
If I am following a recipe and want to infuse tea into it, I will look for either a liquid portion to infuse or butter! In the past I have tried to use tea in place of the warm water for the yeast and for whatever reason they have always failed! This may have nothing to do with tea but to be safe I used the milk in this recipe.
The recipe calls for warm milk and so I heated the milk a bit and put 2 tablespoons of tea in the milk. I let it steep for until fragrant and when the milk was warm and not hot then I strained it and included it in the recipe.
Two notes about this, use more milk for the infusion that the recipe calls for and measure the final amount added to the recipe. You will lose some milk when you heat it and strain it. You can add less or more tea depending on how strong you want the tea flavor!

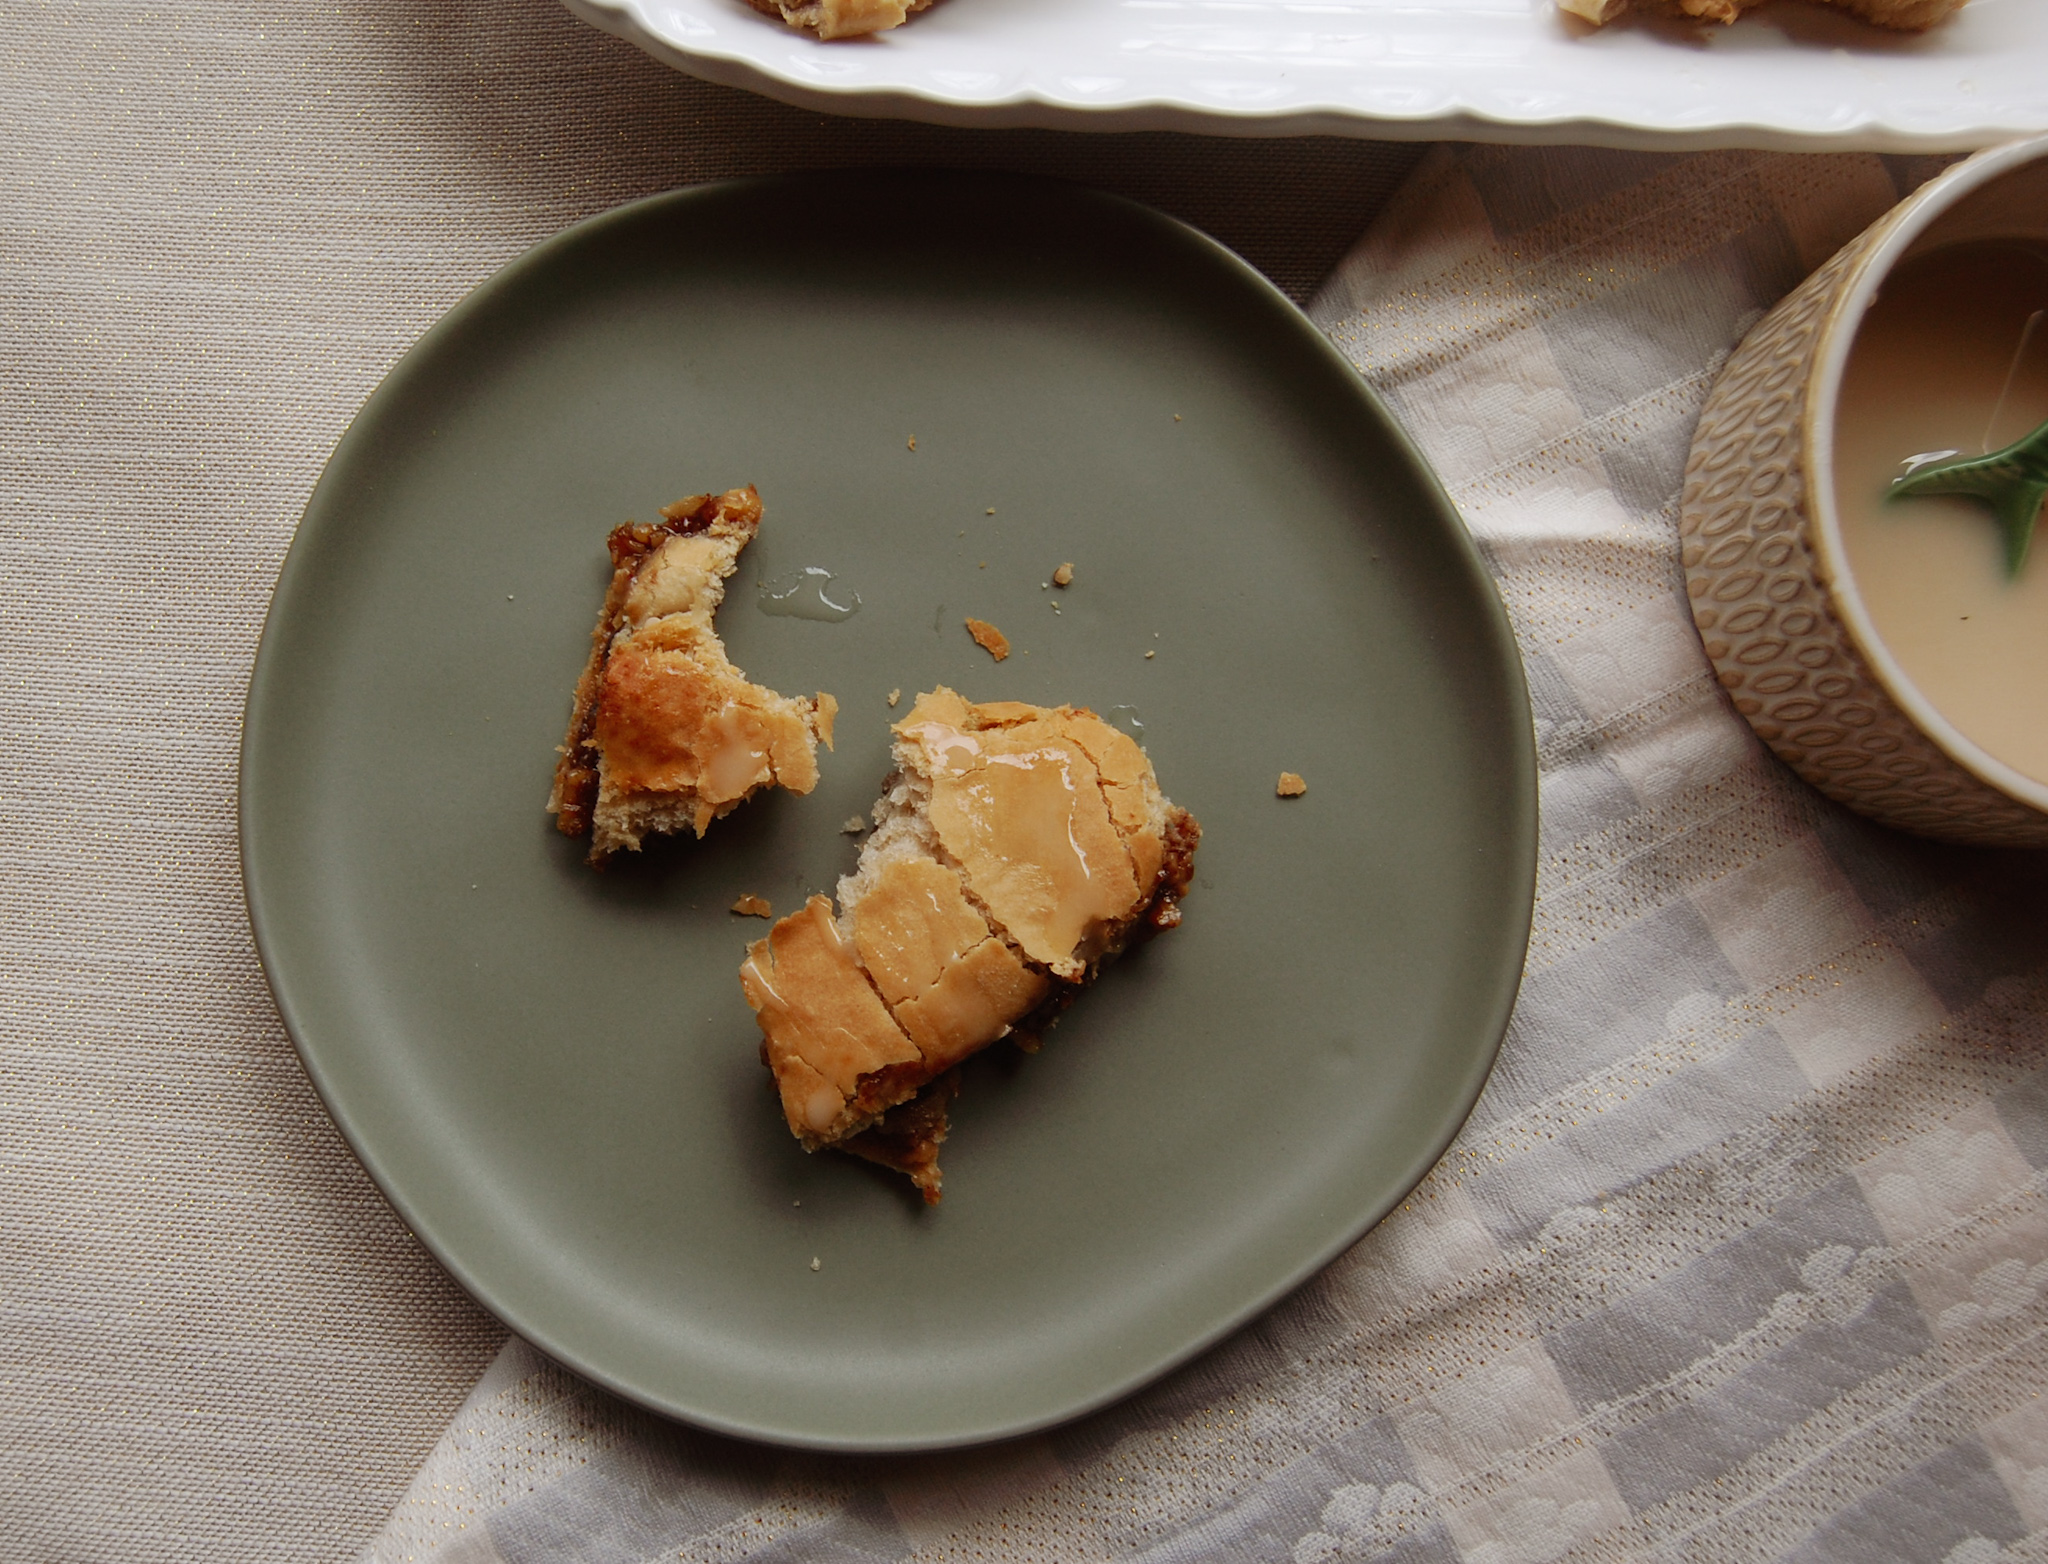
This recipe will not give you the thin kringle that you’re probably used to but it is still delicious. The filling is very sweet and is most of the flavor for this recipe. The topping which is a simple glaze makes this a great sweet treat!
A note about choosing a tea for this recipe. I would suggest choosing a black tea and if you are choosing a blended black to tea remember that the flavor you choose will be subtle in the bread part of this so make sure it is a blend you like!
For example, the tea I used in the blend was Amaretto Spice from The Jasmine Pearl Tea. This tea is a blend of black tea, cinnamon and amaretto flavoring. This combo was ideal because you have the extra cinnamon and almond flavor from the amaretto but nothing too overwhelming!


These turned out really delicious and although they aren’t exactly like the original Kringle they have that lovely flavor!

You can definitely create the shapes listed in the recipe but I will say that although the cookie cutter shape was a bit difficult to cut out since I did it after it was baked, it was nice to just give out heart shaped pieces!
I didn’t decide to do the hearts until after it was baked but I think you could probably cut them out before baking and have it turn out well too!
Tea Infused Mulled Wine
I’ll admit that I’m not a wine drinker. I’ve tried to like it but I don’t usually find it tasty, especially red wine. Most of my drink recipes are made with whiskey which is what I prefer. However, I know that many of you like wine and I’ve always wanted to try making mulled wine so here we go!

After looking at a lot of recipes, I realized most of the ingredients added are just to spice it up a bit. I don’t know much about wine but I do know that I don’t want to waste a really good wine by cooking different ingredients into it. I went to the store and bought a cheap bottle because I would be enhancing the flavor. Feel free to use whatever wine you like best for this recipe!

I also noticed that most of the recipes have some sort of citrus in them. What I chose to do was to use lemon and then a citrus herbal tea. I used Tangerine Ginger from Rishi Tea that came in my Sipsby box. This tea has hibiscus flowers, orange peel, ginger root, citrus oils, licorice root and schizandra berries! Yum yum yum!

I chose to use tea sachets for ease but If you want to use loose leaf, you have to strain the mixture anyway! I wanted to note that this could probably taste good with many teas but I chose an herbal tea because of the high heat. The wine is already potent and I think putting something like black tea in it might run you the risk of getting a bitter flavor.

A few notes about making this recipe. I like to use honey and because of that I added the wine and honey in the pan first and let them mix a little bit. The heat should be on low the entire time. After I added all the other ingredients (except tea bags) I kept it on low with the lid on and just let it simmer. I didn’t really time it, I did it my aroma. Making this wine is delicious but it also makes your house smell so good!!!

Once I felt that the aroma was strong I took off the lid and saw that the mixture was bubbling a little and everything was a bit darker. The cranberries had softened etc. This is when measured the heat of the mixture. My tea bags have the temperature set to 200F and so I made sure the wine was around that temperature then added in the teabags for 5 minutes. If your tea has a lower temperature, let the mixture cool a bit!
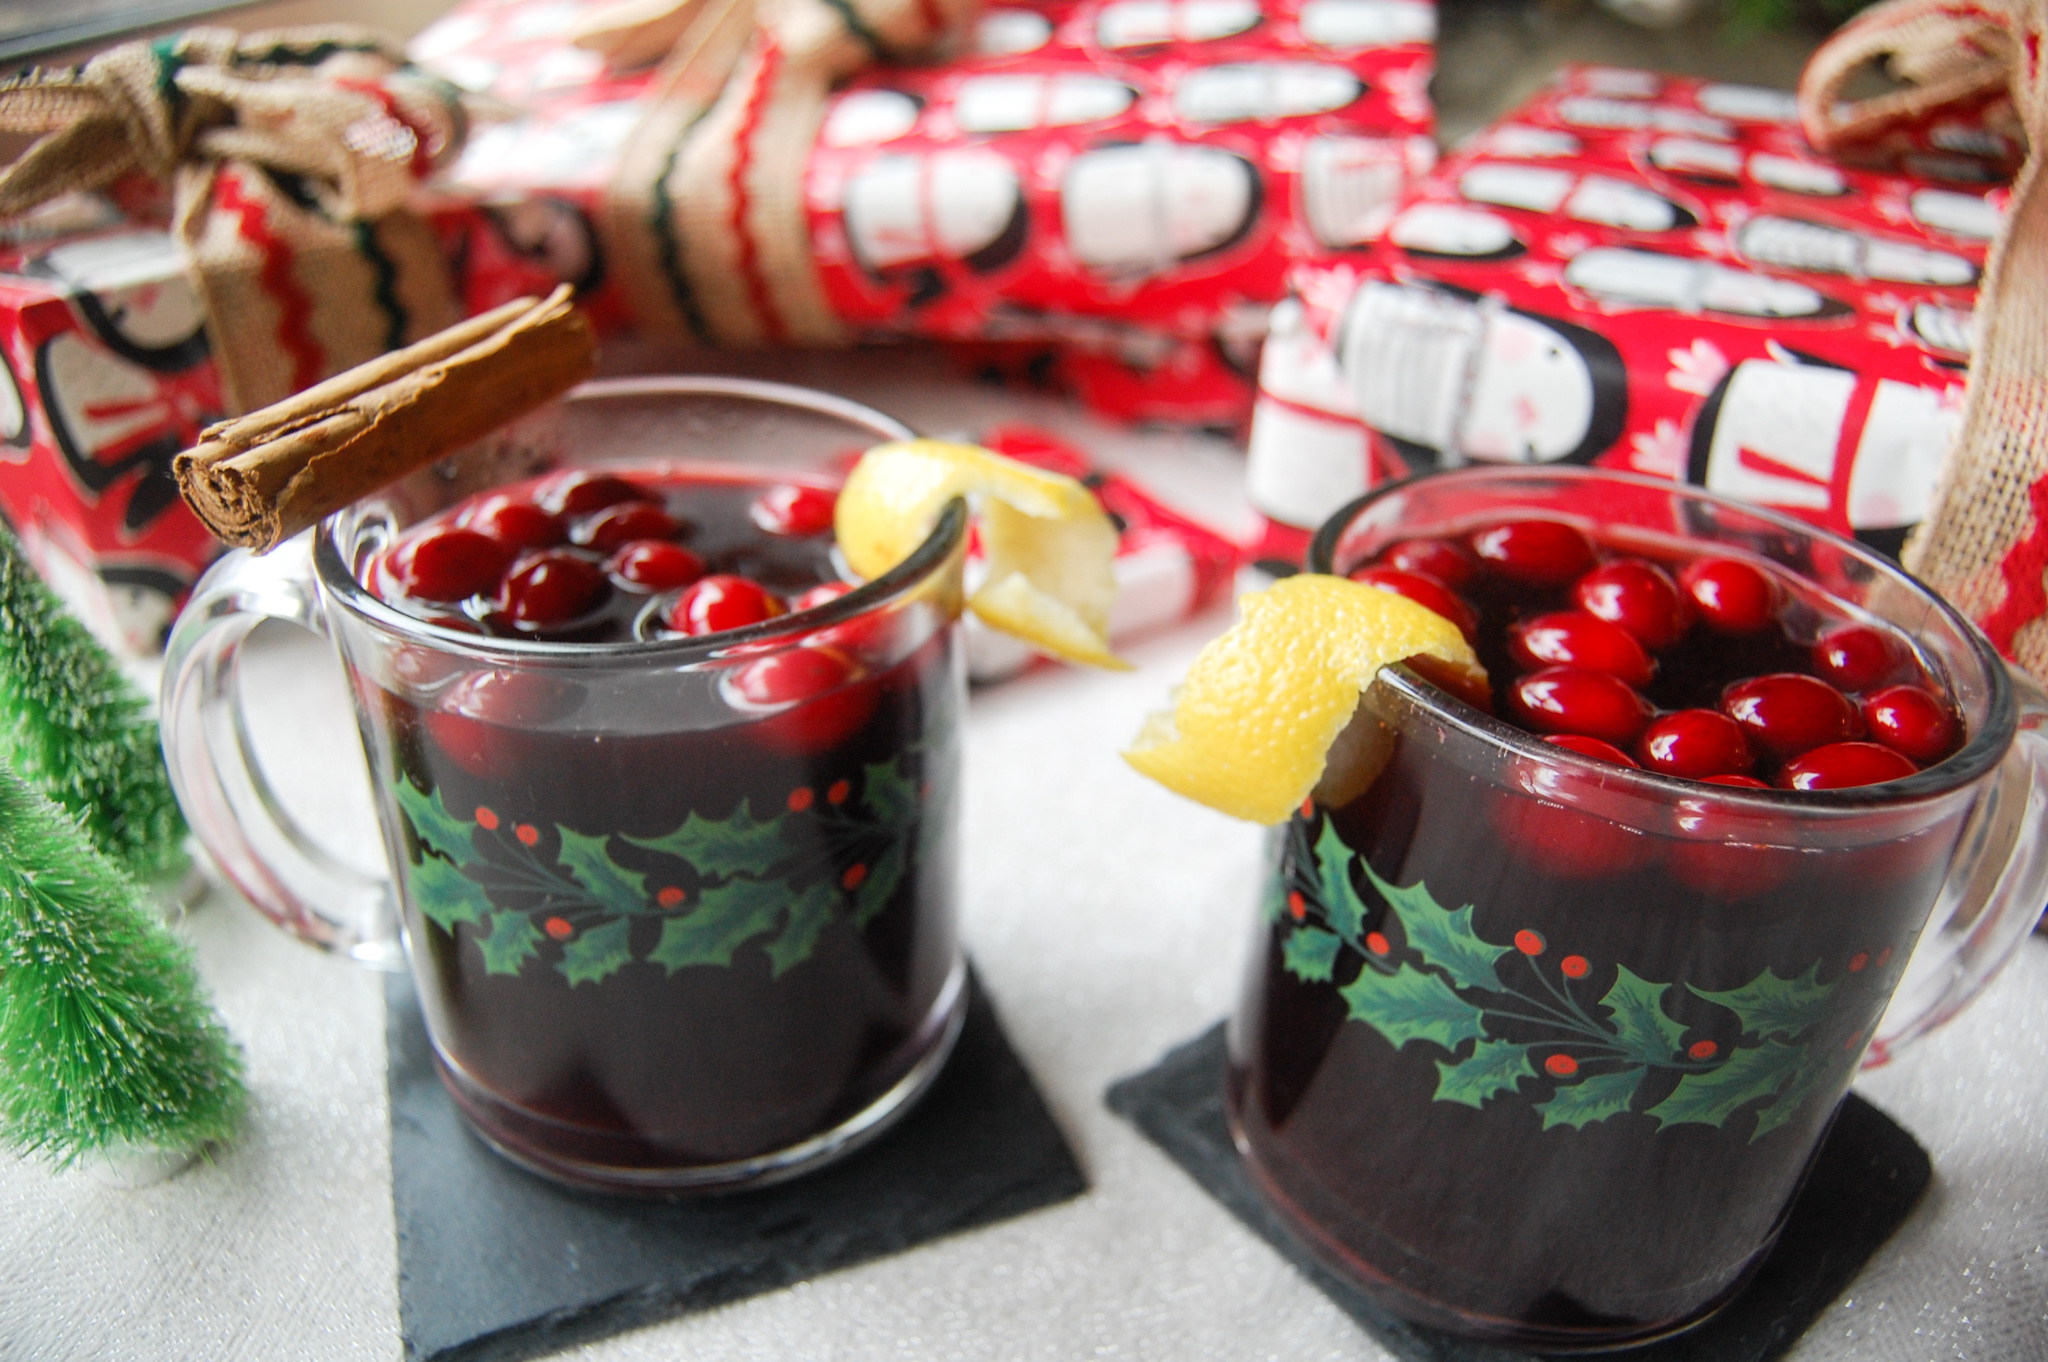
Take out your tea bags, strain and serve in mugs! This amount of ingredients was enough for 2 large mugs and a little more. At a party, it would be best to use smaller mugs and this batch could stretch a bit farther. I also garnishes with fresh cranberries, lemon peel and cinnamon!

Enjoy! Do you have a favorite mulled wine recipe?
Apple Cider Donuts!
I’ve had trouble finding apple cider donuts this year! Maybe I’m not looking in the right places. I did go to a fall festival which definitely had them but I couldn’t be bothered to wait in the long line. I’ve made matcha donuts, pu’er donuts and apple cider before on my blog so I thought I would give these a shot!.
I based my recipe off this one which is what I think you should follow! I did make some changes which I will note below.
The weather has NOT been cooperating with me so I haven’t been able to get any good photos but will update this post when I do!
Infusing tea into the Apple Cider is very simple. If you buy apple cider, make sure to follow the recipe for the apple cider donuts and boil it down a bit. You could then, while it is hot, fill a tea bag with your desired tea and let it steep for a few minutes. When choosing a tea, do not choose a delicate tea because it will get bitter. Go for a tea that can handle hot temperatures like black tea or rooibos. I used a Lavender spice tea that has rooibos in it for my apple cider.
I’ve also linked a recipe I used for apple cider infused with tea above if you want to make it from scratch! Even if you just boil apples then infuse the tea for a few minutes, it still tastes great! I made my apple cider from scratch for these donuts and it turned out well!
The substitutions I made in the Sally’s Baking Addiction recipe are as follows!
1 and 1/2 cups (360ml) apple cider ——> I made my own tea infused apple cider
1/2 cup (100g) packed light or dark brown sugar —-> I used 1 cup dark brown sugar instead of 1/2 brown, 1/2 white. I also used brown sugar for the coating.
1/2 cup (120ml) milk, at room temperature* ——-> I used Oat Milk
1 teaspoon pure vanilla extract——> I didn’t have this so I didn’t use it and they turned out fine!
Even though these donuts are baked, with the melted butter they almost taste fried!
Enjoy!